Tag Archive for: street food

Black Sesame Covered Chewy Turmeric Bagels

The softest low-fat black sesame covered chewy turmeric bagels that are ridiculously tasty and a great basis for a breakfast sandwich.

The softest low-fat black sesame covered chewy turmeric bagels that are ridiculously tasty and a great basis for a breakfast sandwich.

Hey, guys!

Guess what, it’s the first time we’re making bread together. A shocker!! Ok, we’ve made some flatbread, but not bread like this.

Bread making is definitely one of my biggest cooking/baking passion. Digging in the dough and getting your hands all sticky and messy is the best part of making bread at home. And if you think it’s hard, it’s actually not. Sometimes it requires a little time, but it’s mostly just waiting and admiring your beautiful work. How’s that for a change of perspective.

If you’re kneading the dough by hand it’s also a great exercise. Win-win 😀

The softest low-fat black sesame covered chewy turmeric bagels that are ridiculously tasty and a great basis for a breakfast sandwich.

I’ve just recently discovered the art of cooking the bread before it goes to the oven and that’s so lame, right? How could I be ignorant for so long! Cooking the dough before putting it in the oven makes for a nicely browned crust and a chewy middle. Like all bread, I like bagels best when they’re hot. I was always told that eating warm bread would hurt my stomach, but I’ve been doing that for all my life and my stomach is just fine. For now 😀 What can I do, it simply tastes better and its so soft. Who’s with me?

The softest low-fat black sesame covered chewy turmeric bagels that are ridiculously tasty and a great basis for a breakfast sandwich.

The awesomest chewy turmeric bagels

Okay, enough of my babbling…

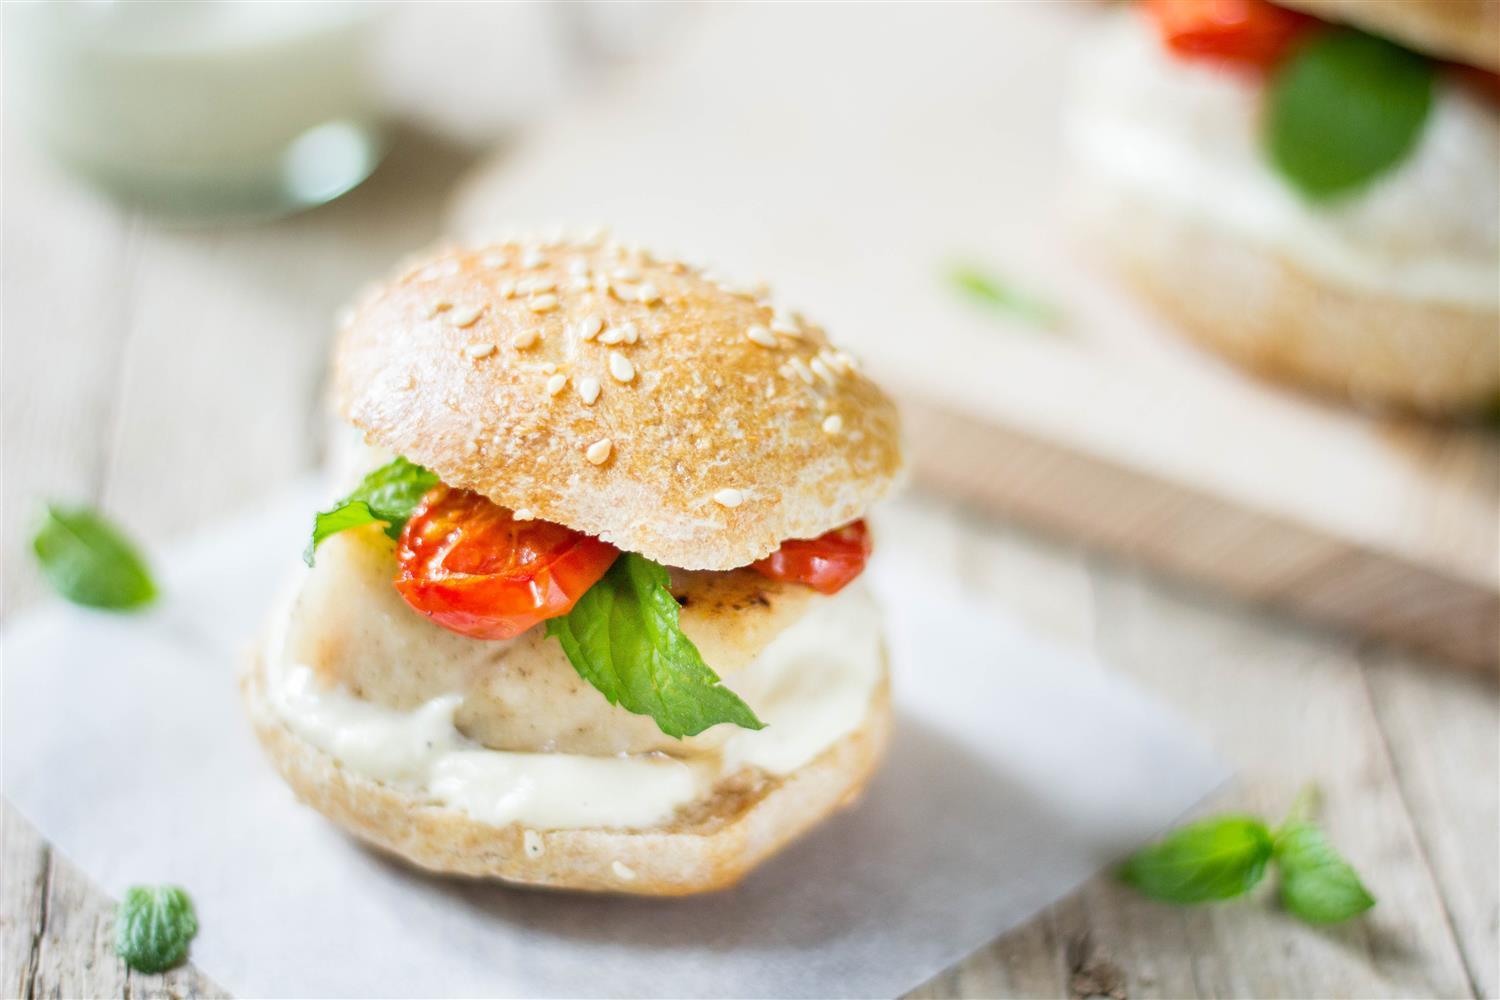
We’re making bagels today. Not the typical New York style bagels, but similar – chewy turmeric bagels with some amazing black sesame seeds on top. I’ve added a bunch of turmeric in the dough, which gives it such a beautiful vivid golden color and a nice aroma along with a hint of bitterness. And the black sesame is just awesome. It has a stronger taste than the lightly colored sesame and it contains a whole bunch of necessary minerals.

I was eager to try it for a while, but it’s not that easy get in Slovenia. And if you do get it it’s very expensive. Finnaly I got my hand on a big bag of it and tried it in this recipe. A-M-A-Z-I-N-G! Besides the obvious, that they look great, they are now even tastier and healthier 🙂

One thing that makes bagels different from normal bread is that we’re using less yeast, which gives it some extra flavor and dense texure inside. We don’t want the bagels to be bready, but rather chewy and moist. Cooking them in water infused with baking soda will make the crust seal and prevent it from rising more in the oven, which will also help create the dense middle and will give the crust a nice darker color. Actually in this case, because we’ve added turmeric to the dough it will become sort of orange or red in some places, so don’t get scared, nothing’s wrong 😛 It’s just more fun!

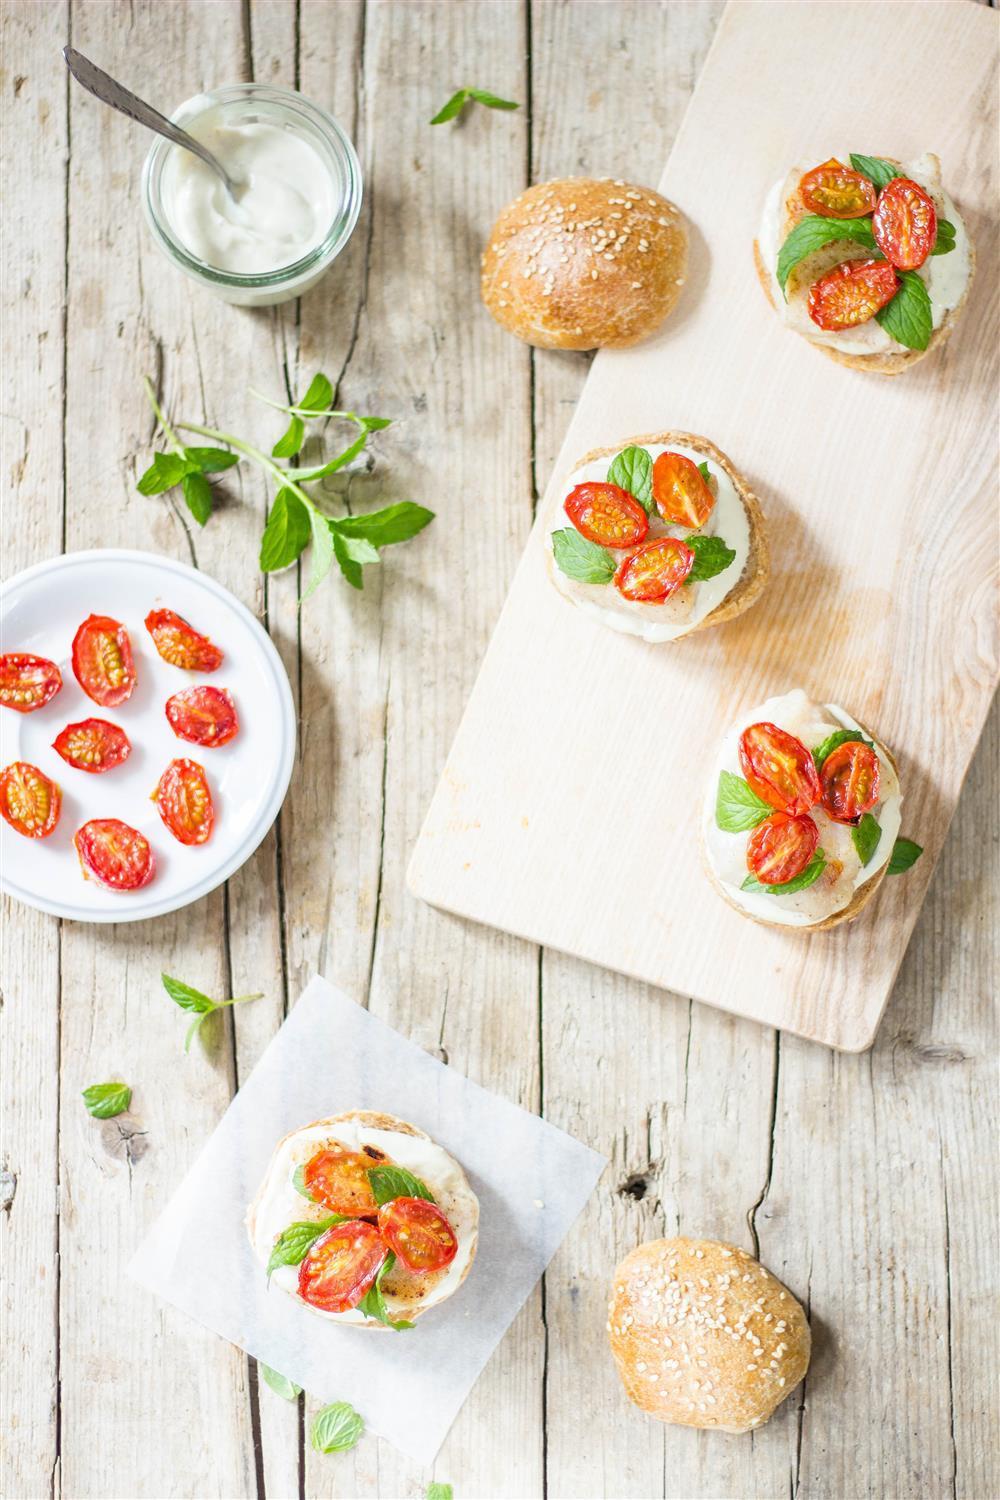
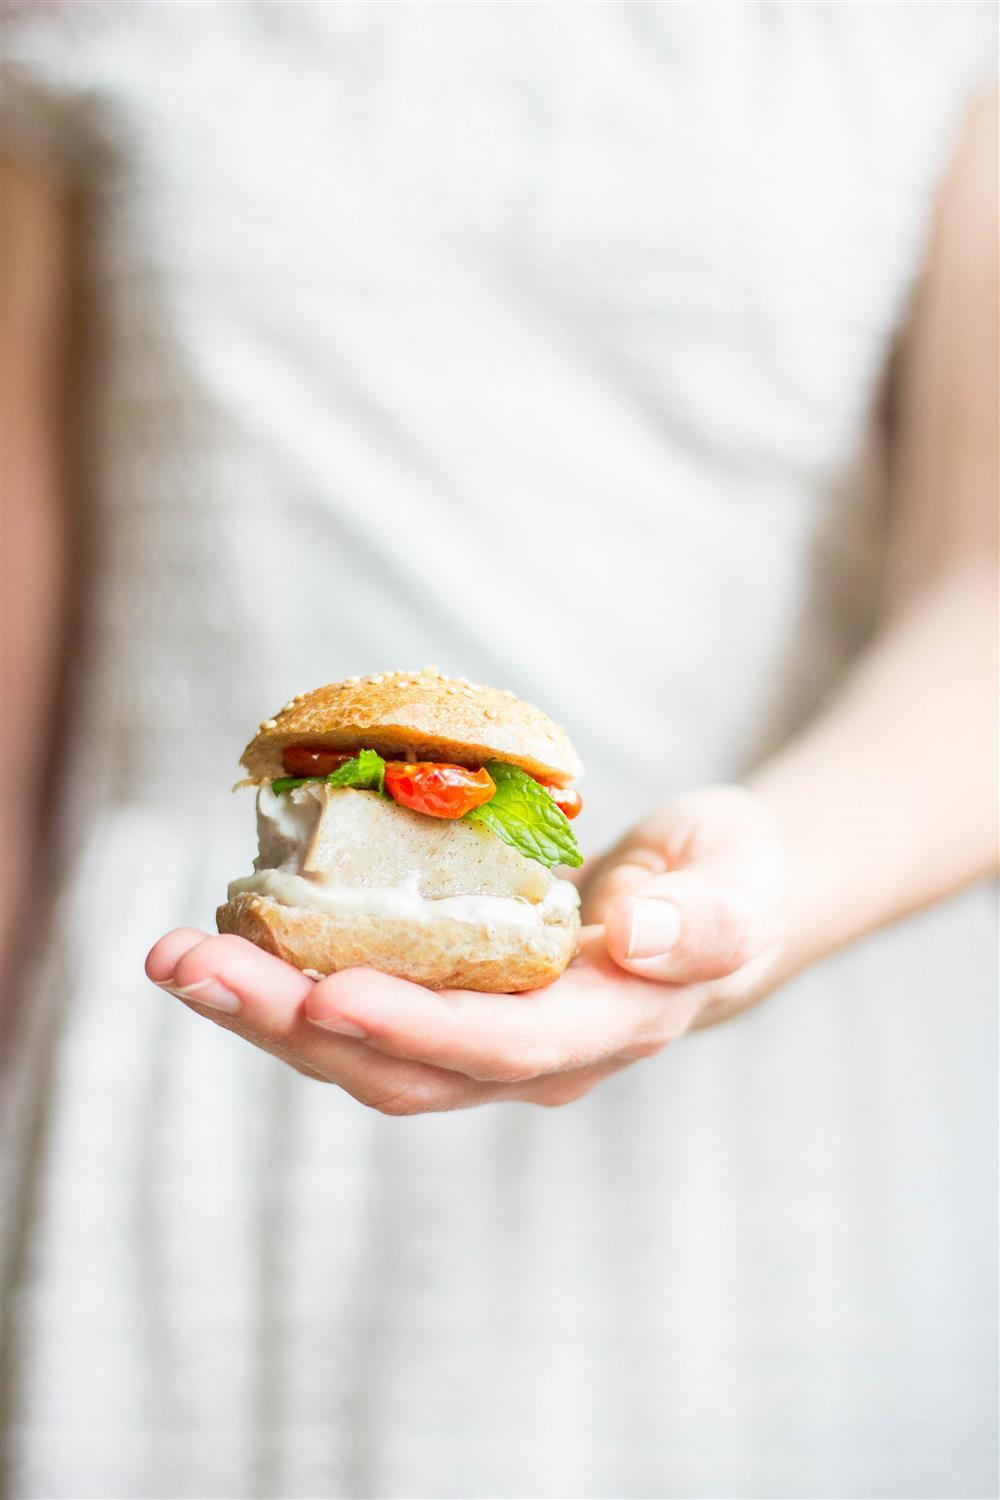
I like to serve bagels with cream cheese or some creamy beet dip with smoked salmon and some leafy greens like spinach or arugula.

The softest low-fat black sesame covered chewy turmeric bagels that are ridiculously tasty and a great basis for a breakfast sandwich.

Yum, yum…let’s go bake!

Tag #useyournoodles so I can see your beautiful UYN creations. Also, stay in touch on Facebook and Instagram or subscribe to get the recipes directly to your mailbox ♥

BLACK SESAME COVERED CHEWY TURMERIC BAGELS

Course Appetizer, Breakfast, Side Dish
Keyword bagels, bread
Total Time 4 hours
Servings 14 bagels

Ingredients

CHEWY TURMERIC BAGELS

  • 6 cups all-purpose flour (900g)
  • 1 TBSP active dry yeast
  • 2 1/2 cups lukewarm water
  • 1 TBSP turmeric
  • 1 TBSP salt

COOKING

  • 1/2 TBSP baking soda per 2 litres of water

TOPPINGS

  • black sesame seeds
  • cornmeal Optional. I like to use it, because it prevents the dough to stick on the paper and it gives the bagel a nice crunch

Instructions

  1. In a bowl of your stand mixer combine 3 cups of flour, all the water and yeast using a whisk. Cover with a cloth and let rise for 30 minutes.
  2. After 30 minutes you will see bubbles on the surface of the dough mixture. Add the remaining flour, turmeric and salt and using a kneading attachment start kneading the dough. Knead for about 10 minutes, then cover the dough with plastic foil and leave to rise in a warm place for about 1 hour and 30 minutes or until it has doubled in size.
  3. Punch the dough and give it a couple of kneads. Divide the dough into 90-110 g chunks. Flatten each piece with hands fold in the sides and roll so you get a cylinder (like a spring roll). Using the palms of your hands roll out the cylinder to about 20 cm long, then overlap one end over the other, pinch hard and use your palm to roll these two ends together.
  4. Let rise covered with a cloth for an hour.
  5. Bring water with baking soda to a boil in a wide skillet. Let it gently simmer while you cook the bagels 60-90 seconds each side. Drain and dip one side of the bagel while still a little wet in black sesame seeds and the other in cornmeal.
  6. Place on a tray lined with baking paper and bake for 20-25 minutes at 220°C until you get a nice golden and red color.

Notes

NOTES
Don’t overcrowd the bagels in water, because they will rise a bit and they may change the shape if they touch other bagels.

The softest low-fat black sesame covered chewy turmeric bagels that are ridiculously tasty and a great basis for a breakfast sandwich.
The softest low-fat black sesame covered chewy turmeric bagels that are ridiculously tasty and a great basis for a breakfast sandwich. Click to find the whole recipe or pin and save for later!

Mulled Wine Christmas Cheeseburger

All the amazing tastes of Christmas in one mulled wine Christmas cheeseburger. Who says Christmas should be celebrated with a roast?

All the amazing tastes of Christmas in one mulled wine Christmas cheeseburger. Who says Christmas should be celebrated with a roast?

Mulled wine in a burger… Say what?

Yes, well, if I can’t drink I’m at least eating mulled wine, although it sounds weird 🙂 But seriously, this is the most Christmas flavored burger I’ve ever had. And I can’t tell how beautifully the house smells after simmering the mulled wine for half an hour. It’s like a potpourri, but you can eat it afterwards 🙂

All the amazing tastes of Christmas in one mulled wine Christmas cheeseburger. Who says Christmas should be celebrated with a roast?

I’m all about Christmas this year, which you’ve probably guessed from my previous recipes. I’m like seriously anxiously waiting for the C day. Not sure why, it’s probably the hormones 😛 Anyway, tree is decorated and more cookies will be baked. All I needed is an awesome savory dish that would match the season. First think that came to my mind was mulled wine. I wasn’t sure if I could acually make it into a thick sauce, so I tried. And it was crazy good. It’s like a mulled wine jam.

Which gives me an idea. I should try it with peanut butter. Yeah, I’m gonna try that, you should, too 😀 And tell me if you love it!

All the amazing tastes of Christmas in one mulled wine Christmas cheeseburger. Who says Christmas should be celebrated with a roast?

So, let’s get into details. By now you know mulled wine sauce is the most important ingredient of this Christmas cheeseburger. But it wouldn’t be a cheeseburger without some cheese!! 

I’m using matured cheddar to contrast the sweet sauce. It has just the right saltiness and spiciness to go perfectly with mulled wine. Plus, who doesn’t love cheddar. When I was cutting the slices, I ate one and left one for the burger… my husband is probably wondering, where all the cheddar went 🙂

And of course, we shouldn’t forget the ORANGE. This cheeseburger is simply not so awesome without it, so don’t leave it out. Seriously! Besides the amazing Christmasy flavor it also gives some freshness and juice. Yum!

All the amazing tastes of Christmas in one mulled wine Christmas cheeseburger. Who says Christmas should be celebrated with a roast?

Ok, final thing, then I’m leaving you all alone with the recipe. Which is very simple, I might add.

The buns! For the first time in my life I made pretzel buns. Crazy! I make my own bread all the time, but never really went for pretzels. I found a very easy recipe for pretzel buns by Eat in my kitchen and I love it. Really simple and incredibly tender, so if you feel confident enough to make your own buns, I strongly recommend you to try them.

All the amazing tastes of Christmas in one mulled wine Christmas cheeseburger. Who says Christmas should be celebrated with a roast?

I know your dying to try the Christmas burgers with mulled wine sauce, so go for it!

Tag #useyournoodles so I can see your beautiful UYN creations. Also, stay in touch on Facebook and Instagram or subscribe to get the recipes directly to your mailbox ♥

MULLED WINE CHRISTMAS CHEESEBURGER

Course Main Course
Keyword beef burger, festive burger
Prep Time 5 minutes
Cook Time 40 minutes
Total Time 45 minutes
Servings 4

Ingredients

MULLED WINE SAUCE

  • 1 1/2 cup dry or semidry red wine
  • 1/2 cup dried cranberries
  • 1/4 cup dried sultanas
  • 1 TBSP honey
  • 1 tsp salt
  • 1/2 tsp cinnamon
  • 1/2 tsp ground ginger
  • 9 cloves
  • 1/2 medium-hot chilli deseeded
  • orange zest of one orange

CHRISTMAS CHEESEBURGER

  • 500 g minced beef
  • 4 pretzel or burger buns
  • 1 big orange sliced to 5mm slices, peel removed
  • 120 g matured cheddar thinly sliced
  • big bunch of arugula
  • salt
  • pepper

Instructions

Mulled Wine Sauce

  1. Put all ingredients for mulled wine sauce in a small saucepan. Bring it to a boil, then reduce heat and let it simmer for 30 minutes.

  2. Use an immerse blender or a regular blender to thicken the sauce. You don't need to make it completely smooth.

Christmas Cheeseburger

  1. Divide minced beef into 4 and make patties that are slightly larger than the bun.

  2. Heat a pan and add a tablespoon of oil. Fry the patties for about 4 minutes on one side. Turn around, season with salt and pepper and cover with slices of cheddar. Cook for another 4 minutes for a medium burger or for 5-6 minutes for a well done. Cover with lid if the cheese needs some help with melting.

Assembly

  1. Cut the buns in half, spread the mulled wine sauce on the bottom part, add the burger patty, top with arugula and slices of oranges. Cover the burgers and enjoy!

Use Yor Noodles - Mulled Wine Christmas Cheeseburger
All the amazing tastes of Christmas in one mulled wine Christmas cheeseburger. Who says Christmas should be celebrated with a roast? Click to find the whole recipe or pin and save for later!

Autumn Harvest Pulled Chicken Sandwich with Homemade Apple BBQ sauce

This apple BBQ sauce flavored pulled chicken sandwich topped with crazy delicious apple slaw and hazelnut yoghurt dressing is da deal!

This apple BBQ sauce flavored pulled chicken sandwich topped with crazy delicious apple slaw and hazelnut yoghurt dressing is da deal!

Anyone else stuck with a whole bunch of apples in the basement and doesn’t know how to use them all?

I’m not much of a fresh apple eater, I’m simply too picky about how I like them. So stacks of sweet semi-rotten apples in the basement donated by our relatives are amost sadly waiting to be eaten.

And oh my god, what to do with all of them?!

This apple BBQ sauce flavored pulled chicken sandwich topped with crazy delicious apple slaw and hazelnut yoghurt dressing is da deal!

Like I mentioned several times, I hate throwing food out, so I created a delicious autumn BBQ sauce made with fresh apples. Perfect recipe for using those not-so-good-looking apples.

And hint hint… you can make more and preserve it for later 😉 This recipe yields about 2 cups and is simple to mulitply!

This apple BBQ sauce flavored pulled chicken sandwich topped with crazy delicious apple slaw and hazelnut yoghurt dressing is da deal!

I’m practically obessed with pulled pork burger, but it takes time. After seeng how awesomely Jessica from How Sweet It Is used chicken and made pulled chicken sandwich, I was inspired and made my own version with my apple BBQ sauce.

And it is delicious, I’m telling you! Soooooo simple and soooooo good 🙂 The sauce takes some time, but no effort at all.

This apple BBQ sauce flavored pulled chicken sandwich topped with crazy delicious apple slaw and hazelnut yoghurt dressing is da deal!

This is like the longest named recipe I’ve probably ever made, it could actually be even longer. But I’ve made myself stop. There’s so much going on here.

The juicy shreded chicken, topped with homemade apple BBQ sauce, freshly cut slaw with apples, carrots and cabbage dressed with hazelnut yoghurt dressing. 

And guess what… the sandwich is topped with some more of the delicious BBQ sauce and chillies. Heaven!

This apple BBQ sauce flavored pulled chicken sandwich topped with crazy delicious apple slaw and hazelnut yoghurt dressing is da deal!

Tag #useyournoodles so I can see your beautiful UYN creations. Also, stay in touch on Facebook and Instagram or subscribe to get the recipes directly to your mailbox ♥

Okay, I’ll stop torturing you. Go ahead and start cooking! 🙂

AUTUMN HARVEST PULLED CHICKEN SANDWICH WITH HOMEMADE APPLE BBQ SAUCE

Course Main Course
Keyword beef burger, sandwich
Prep Time 15 minutes
Cook Time 1 hour
Total Time 1 hour 15 minutes
Servings 6

Ingredients

PULLED CHICKEN

  • 1 kg boneless chicken thighs
  • 2 tsp smoked paprika
  • 1 1/2 tsp salt
  • 1 tsp ground mustard seeds
  • 1/2 tsp ground ginger
  • 1/2 tsp cinnamon
  • 1/2 tsp black pepper

APPLE BBQ SAUCE

  • 1 TBSP butter
  • 1 small onion thinly sliced
  • 2 cloves garlic chopped
  • 4 middle-sized apples chopped into 1-2 cm chunks
  • 1/4 cup water
  • 1/4 cup apple cider vinegar
  • 1/4 cup ketchup
  • 2 TBSP honey
  • 1 TBSP Worchestershire sauce
  • 1 TBSP smoked paprika
  • 1 tsp salt
  • 1/2 tsp ground mustard seeds
  • 1/2 tsp thyme
  • 1/2 tsp cayenne pepper
  • 1/4 tsp black pepper
  • 1/4 tsp ground ginger
  • 1/4 tsp cinnamon

APPLE SLAW

  • 1 big apple
  • 1 big carrot
  • 1/4 big cabbage head

SLAW DRESSING

  • 150 g Greek-style yogurt about 3/4 cup
  • 3 TBSP ground hazelnuts
  • 1 TBSP apple cider vinegar
  • 1/4 tsp salt
  • pinch of black pepper

ADDITIONAL INGREDIENTS

  • 6 soft burger buns
  • chopped parsley
  • sliced chilies

Instructions

Apple BBQ Sauce

  1. Place a medium-sized saucepan over medium-high heat and melt the butter. Add onions and wait for a few minutes to get golden, then add garlic and stir for about a minute. Then add apples, water, and apple cider vinegar, cover, and reduce to medium heat. Cook covered for about 10 minutes or until apples start getting softer.
  2. Uncover and add the rest of the ingredients, mix well, and let gently simmer for about 30 minutes or until most of the apples have fallen apart.
  3. Mix in a blender to get the silky smooth texture.

Pulled chicken

  1. In a big bowl mix all spices together and add chicken thighs. Make sure to coat all the meat with the spice blend.

  2. Place a large pan over high heat and add a tablespoon of olive oil. Cook chicken for 4-5 minutes on each side (cook time will depend on the thickness of the thighs). Make sure the chicken is cooked through before taking it off the pan.
  3. Transfer it to a clean plate and shred it using forks.
  4. Return the shredded chicken to the same pan you used before and add 1/2 cup of apple BBQ sauce (or more if it seems dry) and cook for a minute.

Apple Slaw

  1. Cut the veggies into thin slices. Mix all ingredients for the dressing together.

  2. Toss the veggies with the dressing.

Assembly

  1. Cut burger buns into half and fill them with pulled chicken and apple slaw. Add more apple BBQ sauce on top and top with chopped parsley and chilly slices.

Notes

This recipe was inspired by Saucy Chicken Sandwiches by How Sweet It Is.

This apple BBQ sauce flavored pulled chicken sandwich topped with crazy delicious apple slaw and hazelnut yoghurt dressing is da deal!

Cherry, Brie & Bacon Grilled Quesadilla

Are you ready for a seriously delicioius sweet and salty grilled quesadilla?

Use Your Noodles - Cherry, Brie & Bacon Grilled Quesadilla

Spending time outside was a big part of my childhood. It was the time, when we didn’t have computers. And even  when we got a second hand computer, it only had two games – Prehistorik and Prince of Persia. 

Instead of playing those two (totally awesome) games, I prefered hanging out the kids from my street. I lived (and still do) in a street with almost no traffic, which meant the parents let us run around like crazy all over the place.

Our favourite game was hide-and-seek. We’d wait until it got dark and then played it. Much harder, much more exciting!!! 🙂

A simple recipe for the perfect grilled quesadilla with cherries, gooey brie and bacon for a summer barbaque party.

During the day, we played cards. We even invented our own games or even make our own board games 🙂 I still have some stacked somewhere in my closet!

A big part of spring/summer days on the street was hanging ut in our cherry tree. No treehouse necessary, just an old wood board placed between two branches and we got our fun.

The cherry tree is still majestically standing in front of the house. No kids hanging on it, but it still produces the best cherries around.

Sorry neighbours… 🙂

Use Your Noodles - Cherry, Brie & Bacon Grilled Quesadilla

Grilled quesadilla with cherries anyone?

Today’s recipe is dedicated to the delicious sweet red cherries from that very tree. And they are in season now 🙂

I stuffed them in a quesadilla!

I never order quesadilla in a restaurant. Why? Because it is always too small (I eat a lot!) and overpriced. But I love it so much. So I made these cherry quesadilla with brie, bacon and arugula. I added some crushed chilli for spiciness and balsamic vinegar for acidity. And that’s it! 

It is gooey, smokey and sweet. Can it even get better? Oh, yeah. It is spicy too 🙂 

You can pop it on the grill, while you’re having a barbaque party. I assure you, everyone will thank you 🙂

Use Your Noodles - Cherry, Brie & Bacon Grilled Quesadilla

Tag #useyournoodles so I can see your beautiful UYN creations. Also, stay in touch on Facebook and Instagram or subscribe to get the recipes directly to your mailbox ♥

Let’s get this bbq party started!

CHERRY, BRIE & BACON GRILLED QUESADILLA

Course Appetizer, Main Course
Keyword tortilla
Prep Time 10 minutes
Cook Time 20 minutes
Total Time 30 minutes
Servings 2 people

Ingredients

  • 8 small tortillas
  • 200 g cherries
  • 200 g brie
  • 60 g /12 slices bacon
  • a handful arugula
  • chili flakes to taste
  • balsamic vinegar to taste

Instructions

  1. Preheat the oven to 175 °C and line a baking tray with baking paper.
  2. Deseed the cherries.
  3. Place deseeded cherries on one half of the tray and bacon on the other. Make sure there’s a little space in the middle.
  4. Roast for 10 minutes or until the bacon gets golden and crunchy.
  5. Place brie, bacon, cherries, arugula, and chilly flakes on a tortilla and drizzle with balsamic vinegar. Top with another tortilla and press down.
  6. On a grill or in a grill pan, grill for 2 minutes each side, until they get golden and grill marks are visible.

Also try these recipes at your next bbq:

Simple Fish Sliders With Roasted Garlic Sauce

Homemade Tomato Ketchup

Use Your Noodles - Cherry, Brie & Bacon Grilled Quesadilla

Simple Fish Sliders With Roasted Garlic Sauce

Humble fish sliders with a little twist are the best way to treat your family!

Humble fish sliders with a little twist are the best way to treat your family!

Oh, who am I kidding. They are actually a treat for you. Others can watch and be jealous 😉  And if they behave, they get a bite!

I’m declaring my love to fish. 

I’d choose fish over meat in almost any given situation. They are so tender and delicious. One thing I hate, though, is dry overcooked rubbery fish. Yuck, bring me a glass of water, please!

Humble fish sliders with a little twist are the best way to treat your family!

The beautiful thing about these fish sliders is that you can use any fish you like. This one in the photos is perch, but any white fish or other type would work perfectly.

Ask for a filet and make sure all the bones are out, before cooking it. You don’t want to bite into one. I don’t own a fish bone tweezers, so I use regular tweezers and they work just fine.

Use Your Noodles - Simple Fish Sliders with Roasted Garlic

This is a dish, that takes some time, but basically no effort or special cooking skills… read a book or dance around the house, and in the meantime it’s all cooking. At the end quickly blend the sauce and cook the fish and you’re done. Suuuuper easy! I promise 🙂

I used to be so scared about preparing fish, what if they get stuck on the pan or are undercooked or even soggy. So I avoided making them. But after a few tries, I realised, that they are so easy to work with. Also so much faster to check if they are done or not, than meat. The flaky flesh allows that. 

If you want it to be crispy on the outside, sprinkle with some flour or starch. It will pull out a little moisture from fish and form a really thin layer of batter, which will fry crisp in the pan.

Use Your Noodles - Simple Fish Sliders with Roasted Garlic

Have you ever tried roasted garlic? Before trying these fish sliders, I added separate unpeeled garlic cloves to my roaseted veggies and they turned out o be the most delicios part of the meal.

So I decided to use garlic in a different way. Roast it and make it in a yummy sauce!

I noticed how people are roating whole garlic heads. So, I tried that. Just cut of the top of the garlic head, sprinkle a little oil over, wrap entirely into aluminium foil and roast until it’s soft and fragrant. One of the garlic heads fell apart while I was removing the top, but it roasted as well as the others. 

So, that’s it. The final fun part is squeezing the soft garlic out of the peel.

You can use roasted garlic in many ways. I promise, I’ll do more recipes with it, because it’s awesome!

Use Your Noodles - Simple Fish Sliders with Roasted Garlic

I topped the fish sliders with roasted tomatoes. Again – a little oil, salt and pepper. Throw in the oven and forget about it for half an hour. They add sweetness to the sliders. Top with some mint – I used peppermint, but any would do.

I’m usually the one to complain about lack of crunchiness in burgers, but I’m so into this delicate fish, that I actually prefer not biting into anything hard and spoil the enjoyment 🙂 You can add some chopped nuts or seeds, of course.

Let’s go eat!

Tag #useyournoodles so I can see your beautiful UYN creations. Also, stay in touch on Facebook and Instagram or subscribe to get the recipes directly to your mailbox ♥

SIMPLE FISH SLIDERS WITH ROASTED GARLIC SAUCE

Course Appetizer, Main Course
Keyword burger, burgers, fish burgers
Prep Time 10 minutes
Cook Time 1 hour 10 minutes
Total Time 1 hour 20 minutes
Servings 8 sliders

Ingredients

ROASTED GARLIC SAUCE

  • 2 heads of garlic
  • 1/2 cup crème fraîche or Greek-style yogurt
  • 1 1/2 TBSP lemon juice
  • 2 tsp olive oil
  • salt by taste
  • black pepper by taste

ROASTED TOMATOES

  • 120 g cherry tomatoes ~2 cherry tomatoes per slider
  • 2 tsp olive oil
  • salt by taste
  • black pepper by taste

FISH

  • 400 g white fish filet cut into 8 square pieces
  • 3 TBSP any flour
  • 1 tsp salt
  • black pepper to taste

FISH SLIDERS

  • 8 slider buns
  • fried fish
  • roasted garlic sauce
  • roasted tomatoes
  • handful mint

Instructions

  1. Preheat the oven to 200 °C.

Roasted garlic sauce

  1. Peel away the outer skin of the heads of garlic. Trim away about 0.5 cm of the top, so all cloves are exposed. Place the two heads on separate aluminum foils, sprinkle the exposed parts with olive oil, and wrap in the foil entirely. Roast for 30 – 40 minutes until they are golden and soft.

Roasted tomatoes

  1. Cut cherry tomatoes in half, place them on a baking tray. Sprinkle with olive oil, salt, and pepper. Toss around, to coat them entirely with seasoning. Reduce the oven temperature to 190 °C and roast for about 30 minutes, until they are fragrant and have shrunk a little.

Roasted garlic sauce

  1. Squeeze out the soft parts of garlic into a food processor. Add crème fraîche or Greek yogurt, lemon juice, salt, and pepper. Blend until the sauce is smooth.

Fish

  1. On a big plate sprinkle the fish with flour, salt, and pepper. Move them around the plate, so they get coated on all sides evenly.

  2. Over medium-high heat fry the fish on a tablespoon of oil, 3-4 minutes each side, depending on the thickness.

Assembly

  1. Cut the buns in half, spread on the sauce, add one fish piece per bun, top with mint leaves, and roasted tomatoes. Serve immediately.

More delicious lunch ideas:

Pizza Stuffed Sweet potatoes

Sardine Pate + Wild Garlic Sandwiches

Turmeric Falafel Wraps

Teriyaki Eggplant With Plum Wine

Humble fish sliders with a little twist are the best way to treat your family!