Creating Depth in Food Photos: A Quick and Simple Technique
Creating depth in food photos is often spoken about, but what does it really mean?
We are about to uncover what depth in food photos stands for and learn a straightforward technique to add depth of space to your frame. You can achieve it in many different ways, and I’m going to show you two of the simplest ones. But trust me, they can make a world of an improvement in your food photos.

What is depth in food photos?
Depth refers to a perception of three-dimensionality in the frame. When done right, it gives the illusion of space and volume. It also gives the subject space to stand out and makes the frame appear more realistic and natural.
The easiest (and also essential) way to add a three-dimensional feel to a photo is to create a background, middle ground, and foreground.
What are the background, middle ground, and foreground?
The middle ground is, in short, the part of the photo where the focus lies. It is the middle part of the photo in terms of depth. It is the part between the foreground and the background. This is the part of the frame where your subject lies.
The background is the part behind the middle ground (or your subject), and the foreground is the part of the photo in front of the middle ground. That’s the space between your subject and the camera.
A photo may include only the middle ground and foreground (without the background) or the middle ground and background (without the foreground). And that is up to you to decide what works best for the subject you are photographing and feel you want to create.
However, in a lot of situations, when the photo lacks a sense of space, adding both a background and a foreground is ideal.
How to add a background and a foreground to a food photo?
In this article, I am going to show you two techniques I use in my work to make the background and foreground work best.
In short, to do that, you want to make the background and foreground blurry in regard to your middle ground, which is in focus.
Distance
Adding distance between the elements in the middle ground, foreground, and background is the easiest, most clear way to add a sense of space.
Imagine having your subject on a table that is right next to a wall. The distance between the subject and the wall is so small that both are relatively in focus. That means the sense of space is not as pronounced.
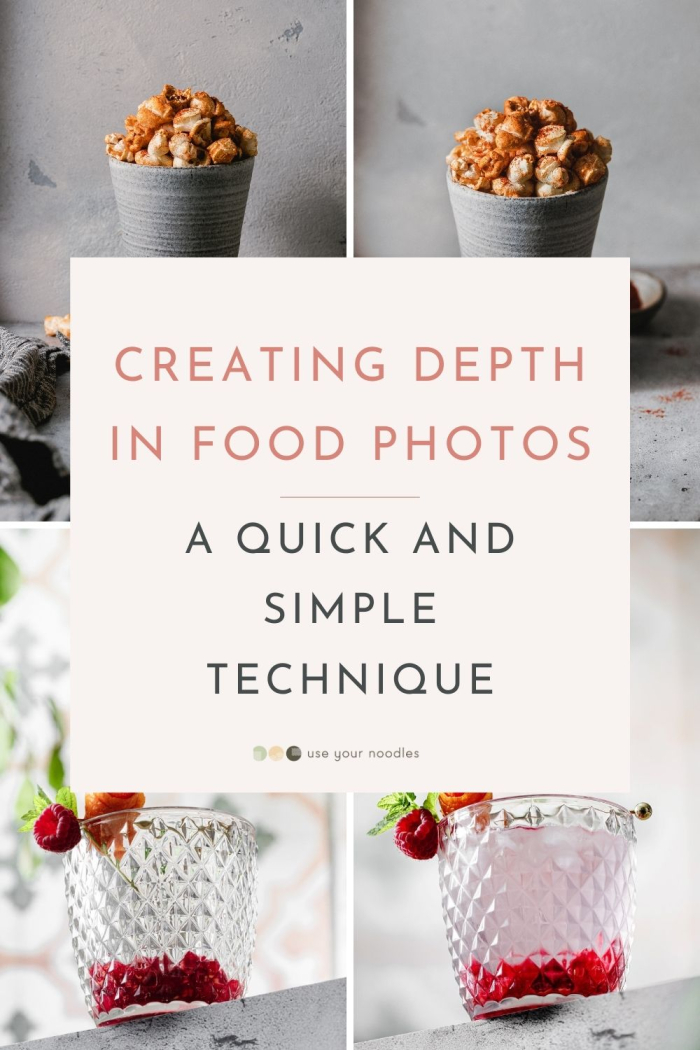
Let’s look at the photo below. I started with a cup placed so it touched the background. What this means is that both the background and the middle ground are in focus. Actually, there really isn’t any background at all. At the same time, nothing significant is placed in the foreground of the image as well, making it look flat.

When I moved the cup towards the camera a bit, I was able to create a separation, and the background was already a bit blurred. I also placed some elements in front of the cup, making them appear a bit blurry. In this photo, you can already feel a sense of space.

What if I went even further? In the next photo, I placed the cup further from the wall, and now the wall looks even more blurred. What that means is that now there is a clear focus on the cup, which is the main subject. It is beautifully isolated while still having a context of what is happening around it.

That being said, the first two photos are not bad. And I am not saying you absolutely need to follow this all the time. But hopefully, this will give you an idea of how differently a photo can feel, depending on how much depth you create.
We will talk more about depth in an upcoming workshop with Bea Luba and me. In order not to miss it, get on the waitlist!

Aperture
Using aperture is an addition to using the distance between the elements. If you learn to use both together, your photography will skyrocket. And this is why you’re here today!
To sum it really quickly, aperture can be used to control the amount of light hitting the camera sensor, but it also controls how much of your scene is in focus.
When setting the aperture on your camera, you will find that it is measured in f-stops. We won’t go into detail as to how that works. If you want to know more, check Food To Frame.
- The higher the f-stop, the more of your scene will be in focus. Meaning more of the background and the foreground will be in focus.
- The lower the f-stop, the less of your scene will be in focus. That means that lower f-stops create more of a separation between the foreground and the background, leaving the middle ground in focus.
Let’s look at a practical example.
In the photo below, I had my backdrop placed quite far away from the scene, but it is still not blurry enough for this photo. The pattern is too recognizable, and there isn’t enough separation between the subject and the background.

I used an f-stop 11 in the photo, making a big chunk of my frame in focus.
Now, let’s look at the second photo. I left the setup exactly the same (besides some greenery), except I switched the f-stop to 2.8, which is the lowest setting on the 100mm lens I used to take this photo.

You can see how much more blurry the background appears. You can still see that there is some pattern, but it is very subtle. And with just changing the f-stop, I was able to create a sense of space.
Additionally, I added some greenery in front to add foreground and enhance the sense of space even more.
Conclusion
In conclusion, creating depth in food photos requires a bit of practice and observation. Observe how the background and foreground interact with your subject whenever you take a photo. Do these add a sense of space to the overall image?


")


This explains it so well. Thank you. I am not well versed in photography at all, but this will be helpful to me when I need to do my own shots.
So happy you found it useful!
Love,
Anja
Thanks so much for this article. Creating depth has been a struggle for me. Your direction is so clear and makes perfect sense.
So happy to hear it’s helpful for you 🙂
Love,
Anja