Tag Archive for: dinner

Autumn Harvest Pulled Chicken Sandwich with Homemade Apple BBQ sauce

This apple BBQ sauce flavored pulled chicken sandwich topped with crazy delicious apple slaw and hazelnut yoghurt dressing is da deal!

This apple BBQ sauce flavored pulled chicken sandwich topped with crazy delicious apple slaw and hazelnut yoghurt dressing is da deal!

Anyone else stuck with a whole bunch of apples in the basement and doesn’t know how to use them all?

I’m not much of a fresh apple eater, I’m simply too picky about how I like them. So stacks of sweet semi-rotten apples in the basement donated by our relatives are amost sadly waiting to be eaten.

And oh my god, what to do with all of them?!

This apple BBQ sauce flavored pulled chicken sandwich topped with crazy delicious apple slaw and hazelnut yoghurt dressing is da deal!

Like I mentioned several times, I hate throwing food out, so I created a delicious autumn BBQ sauce made with fresh apples. Perfect recipe for using those not-so-good-looking apples.

And hint hint… you can make more and preserve it for later 😉 This recipe yields about 2 cups and is simple to mulitply!

This apple BBQ sauce flavored pulled chicken sandwich topped with crazy delicious apple slaw and hazelnut yoghurt dressing is da deal!

I’m practically obessed with pulled pork burger, but it takes time. After seeng how awesomely Jessica from How Sweet It Is used chicken and made pulled chicken sandwich, I was inspired and made my own version with my apple BBQ sauce.

And it is delicious, I’m telling you! Soooooo simple and soooooo good 🙂 The sauce takes some time, but no effort at all.

This apple BBQ sauce flavored pulled chicken sandwich topped with crazy delicious apple slaw and hazelnut yoghurt dressing is da deal!

This is like the longest named recipe I’ve probably ever made, it could actually be even longer. But I’ve made myself stop. There’s so much going on here.

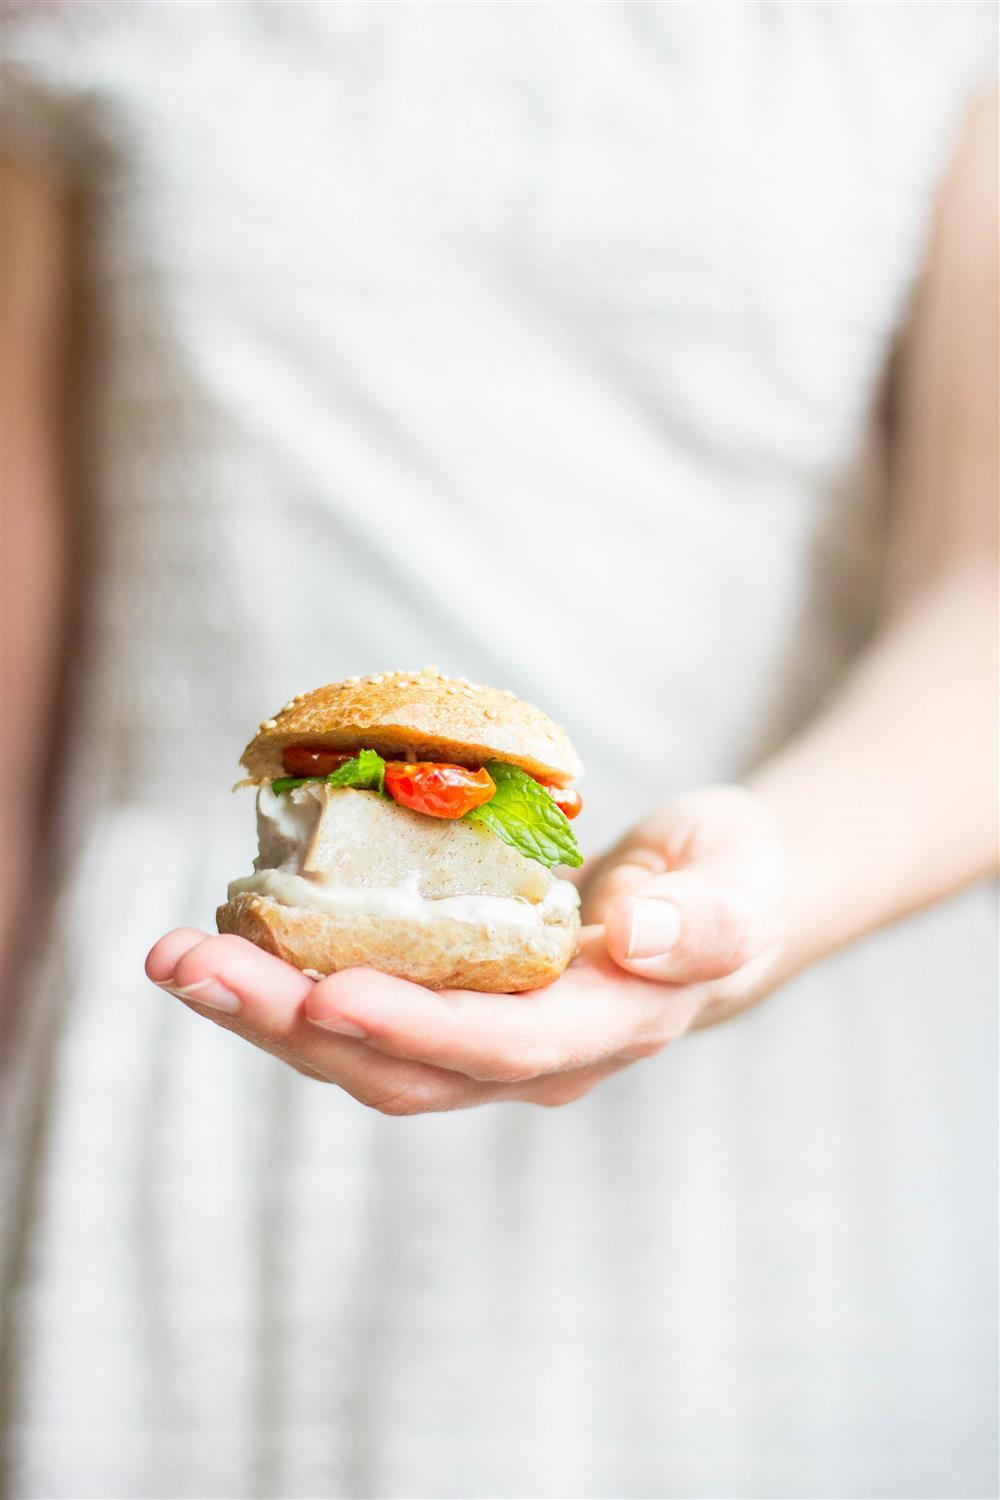
The juicy shreded chicken, topped with homemade apple BBQ sauce, freshly cut slaw with apples, carrots and cabbage dressed with hazelnut yoghurt dressing. 

And guess what… the sandwich is topped with some more of the delicious BBQ sauce and chillies. Heaven!

This apple BBQ sauce flavored pulled chicken sandwich topped with crazy delicious apple slaw and hazelnut yoghurt dressing is da deal!

Tag #useyournoodles so I can see your beautiful UYN creations. Also, stay in touch on Facebook and Instagram or subscribe to get the recipes directly to your mailbox ♥

Okay, I’ll stop torturing you. Go ahead and start cooking! 🙂

AUTUMN HARVEST PULLED CHICKEN SANDWICH WITH HOMEMADE APPLE BBQ SAUCE

Course Main Course
Keyword beef burger, sandwich
Prep Time 15 minutes
Cook Time 1 hour
Total Time 1 hour 15 minutes
Servings 6

Ingredients

PULLED CHICKEN

  • 1 kg boneless chicken thighs
  • 2 tsp smoked paprika
  • 1 1/2 tsp salt
  • 1 tsp ground mustard seeds
  • 1/2 tsp ground ginger
  • 1/2 tsp cinnamon
  • 1/2 tsp black pepper

APPLE BBQ SAUCE

  • 1 TBSP butter
  • 1 small onion thinly sliced
  • 2 cloves garlic chopped
  • 4 middle-sized apples chopped into 1-2 cm chunks
  • 1/4 cup water
  • 1/4 cup apple cider vinegar
  • 1/4 cup ketchup
  • 2 TBSP honey
  • 1 TBSP Worchestershire sauce
  • 1 TBSP smoked paprika
  • 1 tsp salt
  • 1/2 tsp ground mustard seeds
  • 1/2 tsp thyme
  • 1/2 tsp cayenne pepper
  • 1/4 tsp black pepper
  • 1/4 tsp ground ginger
  • 1/4 tsp cinnamon

APPLE SLAW

  • 1 big apple
  • 1 big carrot
  • 1/4 big cabbage head

SLAW DRESSING

  • 150 g Greek-style yogurt about 3/4 cup
  • 3 TBSP ground hazelnuts
  • 1 TBSP apple cider vinegar
  • 1/4 tsp salt
  • pinch of black pepper

ADDITIONAL INGREDIENTS

  • 6 soft burger buns
  • chopped parsley
  • sliced chilies

Instructions

Apple BBQ Sauce

  1. Place a medium-sized saucepan over medium-high heat and melt the butter. Add onions and wait for a few minutes to get golden, then add garlic and stir for about a minute. Then add apples, water, and apple cider vinegar, cover, and reduce to medium heat. Cook covered for about 10 minutes or until apples start getting softer.
  2. Uncover and add the rest of the ingredients, mix well, and let gently simmer for about 30 minutes or until most of the apples have fallen apart.
  3. Mix in a blender to get the silky smooth texture.

Pulled chicken

  1. In a big bowl mix all spices together and add chicken thighs. Make sure to coat all the meat with the spice blend.

  2. Place a large pan over high heat and add a tablespoon of olive oil. Cook chicken for 4-5 minutes on each side (cook time will depend on the thickness of the thighs). Make sure the chicken is cooked through before taking it off the pan.
  3. Transfer it to a clean plate and shred it using forks.
  4. Return the shredded chicken to the same pan you used before and add 1/2 cup of apple BBQ sauce (or more if it seems dry) and cook for a minute.

Apple Slaw

  1. Cut the veggies into thin slices. Mix all ingredients for the dressing together.

  2. Toss the veggies with the dressing.

Assembly

  1. Cut burger buns into half and fill them with pulled chicken and apple slaw. Add more apple BBQ sauce on top and top with chopped parsley and chilly slices.

Notes

This recipe was inspired by Saucy Chicken Sandwiches by How Sweet It Is.

This apple BBQ sauce flavored pulled chicken sandwich topped with crazy delicious apple slaw and hazelnut yoghurt dressing is da deal!

Pumpkin Soup with Balsamic Glazed Onions + A Big Announcement

Warm, sweet and spicy pumpkin soup will be your new favorite autumn comfort food!

Warm, sweet and spicy pumpkin soup will be your new favorite autumn comfort food!

Omg, it’s been so long since my last post. 

So sorry for that, but I’ve had a perfectly good reason. Actually the best reason in the world. We’re having our first little baby in April! 🙂 ♥ How awesome is that! I still can’t believe it’s happening, but we’re happy and excited and can’t wait to meet our tiny bundle.

I haven’t had any major pregnancy discomforts, but one that affected my blogging: I wasn’t able to cook for a month or smell any strong smelling food. Or look at food photos. I’m still struggling with fresh veggies (which I would normally love so much!), but most of the troubles went away now that I’m in my second trimester.

Warm, sweet and spicy pumpkin soup will be your new favorite autumn comfort food!

I’ve been craving sweet food a lot. Not sweets, but sweet savoury food like root veggies and pumpkins. So they’re on the menu a lot these days. One of my all time autumn favorites is definitely pumpkin soup.

What makes pumpkin soup so amazing is its natural sweetness in combination with chillies. Remember how chillies go perfectly with chocolate… well, it’s the same with pumpkin. So don’t skip on it. Seriously! Add less if you’re not into spicy stuff, adding at least a little will make all the difference.

Warm, sweet and spicy pumpkin soup will be your new favorite autumn comfort food!

I don’t like adding much to my simple pumpkin soup recipe. No stock or herbs. Water, garlic, chilli flakes, salt and pepper are enough. I’m using pumpkin purée as my base. If you’d like to make your own check the notes in the Mini Pumpkin Pizzas recipe. A good variety of pumpkin or squash is crucial, so pick one that you absolutely love. 

For me that’s hokkaido or any other with simmilar sweetness. 

A very sweet pumpkin soup like this need a counterbalance, so I added balsamic glased onions with sage on top. I could eat these onions on their own, they are sooooooo good. 

Warm, sweet and spicy pumpkin soup will be your new favorite autumn comfort food!

I’m letting you in on a little secret. I’m dreaming about autumn all year round. I love all seasons, especially when they’re just starting. All the fresh new produce and the feel of change.

But autumn is my favourite. There’s nothing like the magical feel of cold and warmth at the same time. And all the sweet produce it comes with. Yup, best season ever! I’m one of those strange people who love cold and rain 🙂

Warm, sweet and spicy pumpkin soup will be your new favorite autumn comfort food!

Tag #useyournoodles so I can see your beautiful UYN creations. Also, stay in touch on Facebook and Instagram or subscribe to get the recipes directly to your mailbox ♥

Now I’m off to warm myself with a bowl of this delicious pumpkin soup!

Pumpkin Soup with Balsamic Glazed Onions

Prep Time 5 minutes
Cook Time 40 minutes
Total Time 45 minutes
Servings 4 people

Ingredients

Pumpkin soup:

  • 4 cups pumpkin purée
  • 3 cups water (depending on desired consistency)
  • 1 TBSP olive oil
  • 3 cloves garlic chopped
  • 1/2 tsp chilli flakes (add less if you prefer a less spicy version)
  • salt by taste
  • pepper by taste

Balsamic glased onions:

  • 1 medium sized red onion
  • 1 TBSP olive oil
  • 6 sage leaves
  • 1/2 cup water
  • 2 TBSP balsamic vinegar
  • salt by taste
  • pepper by taste

Other topping options:

  • crème fraîche
  • pumpkin seeds
  • pumpkin seed oil
  • chives

Instructions

Balsamic glased onions:

  1. Cut the onion in half and remove the skins. Slice it into 3-5 mm thin slices.

  2. Place a skillet over medium heat and add olive oil. Add the onions and sage and stir to cover them with oil.
  3. Cook uncovered for about 10 minutes stirring occasionally, until the onions get translucent and a bit softer.
  4. Add water, balsamic vinegar, salt and pepper and cover the skillet. Continue cooking over low-medium heat for 20 minutes or until the onions get soft.
  5. Uncover and cook over medium-high heat for additional 5-10 minutes to lose the excess moiture and caramelise the onions. Stir occasionally to check they are not burning.

Pumpkin soup:

  1. Place a pan over medium heat and add olive oil. Add garlic and cook until it gets golden.

  2. Add pumpkin puree, water, chilli flakes, salt and pepper and continue cooking until the soup boils.

Decorating:

  1. Pour hot soup into bowls and decorate with balsamic glased onions. You can add crème fraîche, pumpkin seeds, pumpkin seed oil and chives if you like.

Warm, sweet and spicy pumpkin soup will be your new favorite autumn comfort food!

Warm, sweet and spicy pumpkin soup with balsamic glased onions will be your new favorite autumn comfort food! Click to find the whole recipe or pin and save for later!

Roasted Tomato Galette with Olive Tapende

The sweetest most delicious tomato galette honoring the season of homegrown tomatoes.

The sweetest most delicious tomato galette honoring the season of homegrown tomatoes.

This is one of my favorite dishes in the entire world and I’m not exaggerating.

I’ve been making it for a couple of years now and I’ve perfected the recipe in the meantime.

The sweetest most delicious tomato galette honoring the season of homegrown tomatoes.

I’ve talked about my love of tomatoes a lot and roasting them like in the Simple Fish Slider with Roasted Garlic Sauce. The basic technique of roasting tomatoes is the same as in the slider recipe.

But for this beautiful galette we’re gonna roast them TWICE. Yep, that’s right. First roasting helps the tomatoes loose excess moiture and the second one brings all the components together and adds extra sweetness to the tomato galette.

Isn’t this awesome?

The sweetest most delicious tomato galette honoring the season of homegrown tomatoes.

You could easily use big tomatoes as well, but make sure, they loose most of their moisture after the first roasting, otherwise you’ll get a soggy crust.

And we don’t want that!

The crust should be flacy and crunchy, hence the pre-roasting. Important step – don’t leave it out!

The sweetest most delicious tomato galette honoring the season of homegrown tomatoes.

This tomato galette is filled with so many other ingredients that complement the tomato. 

Like olives, anchovies, fresh herbs like basil and olive oil.

All of those incredible ingredients in one dish 🙂 Perfection…

The sweetest most delicious tomato galette honoring the season of homegrown tomatoes.

Tag #useyournoodles so I can see your beautiful UYN creations. Also, stay in touch on Facebook and Instagram or subscribe to get the recipes directly to your mailbox ♥

Let’s roast some tomatoes!!!

ROASTED TOMATO GALETTE WITH OLIVE TAPENADE

Yields one 28-30 cm (11-12 inch) galette.
Course Appetizer, Main Course
Keyword blackberry pie, blood orange tart, tomato pie, tomato tart
Total Time 1 hour 45 minutes

Ingredients

CRUST

  • 1 1/4 cup wholegrain spelt or wheat flour
  • 60 ml ice-cold water refrigerated for a while
  • 1/2 tsp salt
  • 110 g ice-cold butter cubed

TAPENADE

  • 1 cup green olives pits removed
  • 5 dried tomatoes
  • 5 anchovies
  • 1 TBSP pine nuts
  • a handful parsley
  • a handful chives
  • a handful basil
  • olive oil

FILLING

  • 3 cups cherry tomatoes 600-800g
  • parmesan
  • 3 TBSP olive oil
  • salt
  • pepper
  • 1 egg
  • 1 TBSP cold water

Instructions

  1. Preheat the oven to 190 °C

Crust

  1. Combine butter and flour in a food processor to get a dry mixture. Add salt and water and pulse until the dough starts to form a ball, but not any longer to not overheat the dough. Wrap it in plastic foil and store it in the fridge for an hour.

Roasted cherry tomatoes

  1. Halve the tomatoes, cover with olive oil, salt, and pepper and toss to spread the seasoning. Place cut-side up on a baking tray covered with baking paper and bake for about 30 minutes or until the tomatoes get a nice golden color and have lost a lot of their moisture.

Tapenade

  1. Chop parsley, chives, and basil into smaller chunks and place them in a food processor. Add olives, dried tomatoes, anchovies, pine nuts, and 4-5 TBSP olive oil. Pulse to get an almost smooth texture. Add more olive oil if necessary.

  2. Turn the oven up to 220 °C.

Galette

  1. Roll the dough to about 3mm thick circle. Spread the tapenade over the dough, but leave a clean 2-3cm edge. Cover with roasted tomatoes and fold the edges in over the tomatoes.

  2. In a small bowl beat an egg with a TBSP of cold water and spread thinly over the crust edges.
  3. Sprinkle the galette with some grated parmesan and a little pepper.
  4. Bake for about 20 minutes or until the crust is golden and crunchy.

Notes

Dough recipe adapted from Smitten Kitchen

The sweetest most delicious tomato galette honoring the season of homegrown tomatoes.

Pesto Pasta Salad with Crispy Bacon

There is no summer without a pesto pasta salad topped with a dash of crispy bacon!

There is no summer without a pesto pasta salad topped with a dash of crispy bacon!

Omg, I can’t believe I haven’t made a pasta recipe yet!!!

Banging my head against a wall right now…

I’m like the hugest fan of pasta in any shape or form. Ok, I’d probably choose any pasta over fettuccine, not fan of those – except homemade!

There is no summer without a pesto pasta salad topped with a dash of crispy bacon!

Today we’re making a freaking pesto pasta salad with crispy bacon, folks! And we’re making homemade pesto. How exciting is that!

I never, never, never buy pesto. It’s the easiest thing you can make, why buy it. I even have a trick for winter, when there’s no fresh basil. Every year I try to keep some basil in a pot in the kitchen over winter, but it ALWAYS dyes. 🙁 Boo hoo!

SIMPLE LONG-KEEP PESTO

So here’s the quick tip. Make a simple oil and salt only pesto at the peak of the season. Combine basil leaves with some salt and oil in a food processor and chop it up. It keeps in the fridge for over a year, but you’ll really need to be generous on salt otherwise it can spoil quickly.

That’s also my prefered metod of preserving basil. The taste is much more genuine than the dried one.

There is no summer without a pesto pasta salad topped with a dash of crispy bacon!

So, I want my salads to be fresh with loads of veggies, but there always have to be a goodie. Without an exeption! You know, the piece of feta cheese that’s basically the only reason you’re even eating a Greek salad. Or the pickle you’re dying to fish out of a Russian salad. Or apples in my delicious Millet and Carrot Salad with Creamy Almond Dressing. You see, every salad needs a goodie.

And here it’s CRISPY BACON!

I’m pretty sure my husband loves me more on days when I serve him bacon 🙂

There is no summer without a pesto pasta salad topped with a dash of crispy bacon!

It’s a perfect salad to serve at a picnic. It’s got pasta, tomatoes, bell peppers, mozzarella, pesto and bacon.

Refreshing but filling…

Who wouldn’t love that?!

There is no summer without a pesto pasta salad topped with a dash of crispy bacon!

Tag #useyournoodles so I can see your beautiful UYN creations. Also, stay in touch on Facebook and Instagram or subscribe to get the recipes directly to your mailbox ♥


Not only is this pasta salad super simple and obviously SOOO delicious, but it’s also vibrant and beautiful!

How awesome is that, right?

PESTO PASTA SALAD WITH CRISPY BACON

Course Salad
Total Time 20 minutes
Servings 6

Ingredients

PESTO (~3/4 CUP)

  • big handful basil
  • 3 TBSP almonds
  • 60 g parmesan
  • 2 cloves garlic
  • olive oil
  • pepper
  • salt

PASTA SALAD

  • 500 g whole grain pasta
  • basil pesto
  • 500 g cherry tomatoes halved
  • 2 yellow or red bell peppers chopped
  • 150 g small mozzarella balls halved
  • 100 g bacon
  • juice of 1/2 lemon
  • olive oil
  • salt
  • pepper
  • basil leaves for garnish

Instructions

Pesto

  1. Combine basil, almonds, parmesan, and garlic in a food processor and pulse until coarsely chopped. Add olive oil one tablespoon at a time and mix until smooth. You'll probably need around 8 tablespoons. Season with salt and pepper.

Pasta salad

  1. Bring a large pan of salted water to a boil and add pasta. Cook until al dente and rinse under cold water.

  2. Place bacon strips into a large skillet and cook over low heat. When the meat starts to get dark red turn the stripes around with tongs. If there’s too much grease in the skilled, spoon it out. The bacon is done when it’s dark red on both sides. Move the stripes onto a plate covered with a paper towel and wait a couple of minutes until it crisps up. Then use your hands to break it apart into small pieces.
  3. Put the pasta in a bowl and add the pesto. Mix it well.
  4. Add tomatoes, peppers, mozzarella, half of the bacon, and lemon juice and mix well.
  5. Season with salt and pepper and add a drizzle of olive oil if necessary.
  6. Top with remaining bacon and basil leaves.

There is no summer without a pesto pasta salad topped with a dash of crispy bacon!

Lemony Tomato Gazpacho

This easy lemony tomato gazpacho recipe will save the hot days, when you don’t feel like cooking.

Use Your Noodles - Lemony Tomato Gazpacho

I love watching my tomatoes grow. It’s an obsession.

Some people go for a morning walk in the forest, I take a stroll in the garden to check what’s grown overnight.

So now I’m anxiously waiting for my tomatoes to ripen and then I can eat them like apples. That’s my favorite way!

I even have a photo from when I was little, sitting in the garden and eating a whole tomato. Good times 🙂

This easy lemony tomato gazpacho recipe will save the hot days, when you don't feel like cooking.

A while ago I attended an awesome workshop organized by the culinary & lifestyle magazine Radegunda and guess what… all the dishes we were making were based on tomatoes. 

Which means I was in heaven 🙂

We were making all kinds of stuff… and eating them, which was the best part, for sure!

Use Your Noodles - Lemony Tomato Gazpacho

Inspired by the workshop and the anticipation of homegrown tomatoes I created this simple 5-minute tomato gazpacho.

Head on to the fridge or the garden, whatever’s closer, and get some fresh vegetables. Chop them up, blend for a minute or two and you’ll get the most refreshing lunch you’ll have this summer.

Best part of this recipe is the lemon zest. It makes all the difference. Don’t skip on it, but be sure to buy organic lemons.

Use Your Noodles - Lemony Tomato Gazpacho

Tag #useyournoodles so I can see your beautiful UYN creations. Also, stay in touch on Facebook and Instagram or subscribe to get the recipes directly to your mailbox ♥

Hungry yet?

LEMONY TOMATO GAZPACHO

Course Appetizer, Soup
Keyword fresh soup, gazpacho, tomato gazpacho
Total Time 5 minutes
Servings 8

Ingredients

  • 8 tomatoes
  • 1 cucumber peel if you are looking for nice red color
  • 1 red or yellow pepper seeds and stem removed
  • 1 medium-sized onion peeled
  • 3 cloves garlic peeled
  • 1 TBSP olive oil
  • 1 TBSP lemon juice
  • zest of 1 lemon
  • black pepper
  • salt

Instructions

  1. Chop the vegetables into chunks.
  2. In a blender, mix together all ingredients, until you get a smooth soup.
  3. Pour into cups or bowl and serve cold.

Notes

Keep the vegetables in the fridge for a couple of hours before making the soup.

Also try this refreshing summer treats:

Minty Watermelon Slushie Drink

Roasted Peach and Strawberry Fizz

Peach and Celery Ice Lolly

Use Your Noodles - Lemony Tomato Gazpacho

Cherry, Brie & Bacon Grilled Quesadilla

Are you ready for a seriously delicioius sweet and salty grilled quesadilla?

Use Your Noodles - Cherry, Brie & Bacon Grilled Quesadilla

Spending time outside was a big part of my childhood. It was the time, when we didn’t have computers. And even  when we got a second hand computer, it only had two games – Prehistorik and Prince of Persia. 

Instead of playing those two (totally awesome) games, I prefered hanging out the kids from my street. I lived (and still do) in a street with almost no traffic, which meant the parents let us run around like crazy all over the place.

Our favourite game was hide-and-seek. We’d wait until it got dark and then played it. Much harder, much more exciting!!! 🙂

A simple recipe for the perfect grilled quesadilla with cherries, gooey brie and bacon for a summer barbaque party.

During the day, we played cards. We even invented our own games or even make our own board games 🙂 I still have some stacked somewhere in my closet!

A big part of spring/summer days on the street was hanging ut in our cherry tree. No treehouse necessary, just an old wood board placed between two branches and we got our fun.

The cherry tree is still majestically standing in front of the house. No kids hanging on it, but it still produces the best cherries around.

Sorry neighbours… 🙂

Use Your Noodles - Cherry, Brie & Bacon Grilled Quesadilla

Grilled quesadilla with cherries anyone?

Today’s recipe is dedicated to the delicious sweet red cherries from that very tree. And they are in season now 🙂

I stuffed them in a quesadilla!

I never order quesadilla in a restaurant. Why? Because it is always too small (I eat a lot!) and overpriced. But I love it so much. So I made these cherry quesadilla with brie, bacon and arugula. I added some crushed chilli for spiciness and balsamic vinegar for acidity. And that’s it! 

It is gooey, smokey and sweet. Can it even get better? Oh, yeah. It is spicy too 🙂 

You can pop it on the grill, while you’re having a barbaque party. I assure you, everyone will thank you 🙂

Use Your Noodles - Cherry, Brie & Bacon Grilled Quesadilla

Tag #useyournoodles so I can see your beautiful UYN creations. Also, stay in touch on Facebook and Instagram or subscribe to get the recipes directly to your mailbox ♥

Let’s get this bbq party started!

CHERRY, BRIE & BACON GRILLED QUESADILLA

Course Appetizer, Main Course
Keyword tortilla
Prep Time 10 minutes
Cook Time 20 minutes
Total Time 30 minutes
Servings 2 people

Ingredients

  • 8 small tortillas
  • 200 g cherries
  • 200 g brie
  • 60 g /12 slices bacon
  • a handful arugula
  • chili flakes to taste
  • balsamic vinegar to taste

Instructions

  1. Preheat the oven to 175 °C and line a baking tray with baking paper.
  2. Deseed the cherries.
  3. Place deseeded cherries on one half of the tray and bacon on the other. Make sure there’s a little space in the middle.
  4. Roast for 10 minutes or until the bacon gets golden and crunchy.
  5. Place brie, bacon, cherries, arugula, and chilly flakes on a tortilla and drizzle with balsamic vinegar. Top with another tortilla and press down.
  6. On a grill or in a grill pan, grill for 2 minutes each side, until they get golden and grill marks are visible.

Also try these recipes at your next bbq:

Simple Fish Sliders With Roasted Garlic Sauce

Homemade Tomato Ketchup

Use Your Noodles - Cherry, Brie & Bacon Grilled Quesadilla

Simple Fish Sliders With Roasted Garlic Sauce

Humble fish sliders with a little twist are the best way to treat your family!

Humble fish sliders with a little twist are the best way to treat your family!

Oh, who am I kidding. They are actually a treat for you. Others can watch and be jealous 😉  And if they behave, they get a bite!

I’m declaring my love to fish. 

I’d choose fish over meat in almost any given situation. They are so tender and delicious. One thing I hate, though, is dry overcooked rubbery fish. Yuck, bring me a glass of water, please!

Humble fish sliders with a little twist are the best way to treat your family!

The beautiful thing about these fish sliders is that you can use any fish you like. This one in the photos is perch, but any white fish or other type would work perfectly.

Ask for a filet and make sure all the bones are out, before cooking it. You don’t want to bite into one. I don’t own a fish bone tweezers, so I use regular tweezers and they work just fine.

Use Your Noodles - Simple Fish Sliders with Roasted Garlic

This is a dish, that takes some time, but basically no effort or special cooking skills… read a book or dance around the house, and in the meantime it’s all cooking. At the end quickly blend the sauce and cook the fish and you’re done. Suuuuper easy! I promise 🙂

I used to be so scared about preparing fish, what if they get stuck on the pan or are undercooked or even soggy. So I avoided making them. But after a few tries, I realised, that they are so easy to work with. Also so much faster to check if they are done or not, than meat. The flaky flesh allows that. 

If you want it to be crispy on the outside, sprinkle with some flour or starch. It will pull out a little moisture from fish and form a really thin layer of batter, which will fry crisp in the pan.

Use Your Noodles - Simple Fish Sliders with Roasted Garlic

Have you ever tried roasted garlic? Before trying these fish sliders, I added separate unpeeled garlic cloves to my roaseted veggies and they turned out o be the most delicios part of the meal.

So I decided to use garlic in a different way. Roast it and make it in a yummy sauce!

I noticed how people are roating whole garlic heads. So, I tried that. Just cut of the top of the garlic head, sprinkle a little oil over, wrap entirely into aluminium foil and roast until it’s soft and fragrant. One of the garlic heads fell apart while I was removing the top, but it roasted as well as the others. 

So, that’s it. The final fun part is squeezing the soft garlic out of the peel.

You can use roasted garlic in many ways. I promise, I’ll do more recipes with it, because it’s awesome!

Use Your Noodles - Simple Fish Sliders with Roasted Garlic

I topped the fish sliders with roasted tomatoes. Again – a little oil, salt and pepper. Throw in the oven and forget about it for half an hour. They add sweetness to the sliders. Top with some mint – I used peppermint, but any would do.

I’m usually the one to complain about lack of crunchiness in burgers, but I’m so into this delicate fish, that I actually prefer not biting into anything hard and spoil the enjoyment 🙂 You can add some chopped nuts or seeds, of course.

Let’s go eat!

Tag #useyournoodles so I can see your beautiful UYN creations. Also, stay in touch on Facebook and Instagram or subscribe to get the recipes directly to your mailbox ♥

SIMPLE FISH SLIDERS WITH ROASTED GARLIC SAUCE

Course Appetizer, Main Course
Keyword burger, burgers, fish burgers
Prep Time 10 minutes
Cook Time 1 hour 10 minutes
Total Time 1 hour 20 minutes
Servings 8 sliders

Ingredients

ROASTED GARLIC SAUCE

  • 2 heads of garlic
  • 1/2 cup crème fraîche or Greek-style yogurt
  • 1 1/2 TBSP lemon juice
  • 2 tsp olive oil
  • salt by taste
  • black pepper by taste

ROASTED TOMATOES

  • 120 g cherry tomatoes ~2 cherry tomatoes per slider
  • 2 tsp olive oil
  • salt by taste
  • black pepper by taste

FISH

  • 400 g white fish filet cut into 8 square pieces
  • 3 TBSP any flour
  • 1 tsp salt
  • black pepper to taste

FISH SLIDERS

  • 8 slider buns
  • fried fish
  • roasted garlic sauce
  • roasted tomatoes
  • handful mint

Instructions

  1. Preheat the oven to 200 °C.

Roasted garlic sauce

  1. Peel away the outer skin of the heads of garlic. Trim away about 0.5 cm of the top, so all cloves are exposed. Place the two heads on separate aluminum foils, sprinkle the exposed parts with olive oil, and wrap in the foil entirely. Roast for 30 – 40 minutes until they are golden and soft.

Roasted tomatoes

  1. Cut cherry tomatoes in half, place them on a baking tray. Sprinkle with olive oil, salt, and pepper. Toss around, to coat them entirely with seasoning. Reduce the oven temperature to 190 °C and roast for about 30 minutes, until they are fragrant and have shrunk a little.

Roasted garlic sauce

  1. Squeeze out the soft parts of garlic into a food processor. Add crème fraîche or Greek yogurt, lemon juice, salt, and pepper. Blend until the sauce is smooth.

Fish

  1. On a big plate sprinkle the fish with flour, salt, and pepper. Move them around the plate, so they get coated on all sides evenly.

  2. Over medium-high heat fry the fish on a tablespoon of oil, 3-4 minutes each side, depending on the thickness.

Assembly

  1. Cut the buns in half, spread on the sauce, add one fish piece per bun, top with mint leaves, and roasted tomatoes. Serve immediately.

More delicious lunch ideas:

Pizza Stuffed Sweet potatoes

Sardine Pate + Wild Garlic Sandwiches

Turmeric Falafel Wraps

Teriyaki Eggplant With Plum Wine

Humble fish sliders with a little twist are the best way to treat your family!

Pizza Stuffed Sweet Potatoes

These sweet potatoes are filled with a cheezy pizza stuffing. A perfect way to make pizza without the crust!

Use Your Noodles - Pizza Stuffed Sweet Potatoes

Pizza is one of my favorite foods. I can eat it in any form, regular crust, cauliflower crust, loaded with cheese or only with a deliciously simple tomato sauce. You name it, I eat it! 

Sweet potatoes go into same category. I can eat it whenever, breakfast, lunch, dinner or midnight snack 😉

So this week I’m bringing those two together. In the shape of a decadent pizza stuffed sweet potatoes. Are you excited? I sure am!

These sweet potatoes are filled with a cheezy pizza stuffing

We’ve been working hard on our dance show, which will premiere in a month. If you are interested in how it looked the previous years, go see Tribal Bizzare site. As you would imagine, we’re spending a lot of time practicing, sewing costumes and making props for the show. It’s an exciting time! Stresfull, but fun at the same time. If you’ve got some interesting hobbies of your own, I’d love to hear about them in the comments 🙂 🙂 🙂

Use Your Noodles - Pizza Stuffed Sweet Potatoes

Ok, back to the sweet potatoes! This recipe is a little quicker that the usuall stuffed sweet potatoes. I cut the potatoes in half before baking, which shortenes the baking time and it makes the top of the sweet potato flesh even sweeter. After it is baked I mash the flesh and add A LOT of stuffing, then press it in the potato, so I can add some more on the top. Haha! These here, look almost roud, I pressed so much stuffing in. But that’s ok, right? 

Sweet potatoes are basically quilt-free comfort food. All sweet and yummy, but with a low IG and loads of vitamins and minerals. 

I love the fact that we can eat the skins. When I was a child, my mum would allways peel the potatoes (note: sweet potatoes were nowhere to be found in Slovenia at that time). We’d only eat the spring potatoes with the skin still on, otherwise it was chopped off! Later I realized that the skins are actually the best part of a potatoes. ♥ It goes the same with sweet potatoes.

Use Your Noodles - Pizza Stuffed Sweet Potatoes

Tag #useyournoodles so I can see your beautiful UYN creations. Also, stay in touch on Facebook and Instagram or subscribe to get the recipes directly to your mailbox ♥

And now…drumrolllllllllllll…the recipe –>

PIZZA STUFFED SWEET POTATOES

Course Appetizer, Main Course, Side Dish
Keyword stuffed potatoes
Total Time 45 minutes
Servings 3 people

Ingredients

  • 1 kg sweet potatoes
  • 100 g champignons or any other mushroom that you like sliced thinly
  • 200 g mozzarella cheese 1 cm cubes
  • 100 g cherry tomatoes deseeded and cut into small pieces
  • 30 g olives sliced thinly
  • a handful of basil chopped

Instructions

  1. Preheat the oven to 200 °C.
  2. Wash and dry your sweet potatoes. Cut them in half and oil it on both sides with olive oil. Add a little salt and pepper.
  3. Place potato halves cut side down on a baking tray lined with baking paper.
  4. Bake sweet potatoes for 30 minutes, or until they are soft when poked with a fork.
  5. 10 minutes before the sweet potatoes are done fry the mushrooms in a pan with a little oil, until they get golden. This will take a couple of minutes.
  6. In a bowl, prepare the stuffing. Mix mushrooms, mozzarella cheese, cherry tomatoes, olives, and basil.
  7. When sweet potatoes are done, take them out of the oven and turn them around.
  8. With a fork, mash the flesh and add seasoning if necessary. Stuff them with cheese mixture and press it down firmly. Add any left mixture on top.
  9. Return to the oven for 5 – 10 minutes, until cheese has melted and got a light golden color.

Use Your Noodles - Pizza Stuffed Sweet Potatoes

Turmeric Falafel Wraps + Wholegrain Spelt Tortillas

Fresh and healthy lunch with lots of colours to fill our daily rainbow – turmeric falafel wraps! And my favourite recipe for homemade wholegrain spelt tortillas!

Use Your Noodles - Turmeric Falafel Wraps

It’s March!!! Hmmm, it’s been March for more than a week, but my brain just grasped that.

Ah, I love March. Why? Because I start growing my veggies from seeds. I first tried it three years ago and  I produced some tomatoes, but the plants were looking a little sad and small. Last year, though, it’s been incredible. I’ve produced toooo many tomato plants (not enough space in the garden) and added bell peppers and chilies. The summer was unbelievably sunny and warm and we had a gazillion of homemade tomatoes and chilies. No complaints here. I’ve grown bell peppers in a container on my balcony near lice infected parsley and cilantro, so imagine the disappointment. Hopefully, this year the bell peppers will join the growing madness 🙂

Okay, now. Let’s get to the recipe!

Use Your Noodles - Turmeric Falafel Wraps + Wholegrain Spelt Tortillas

I’m going double recipe today. Wholegrain spelt tortillas that you can use like regular white flour tortillas and a beautiful bright yelllow turmeric falafel.

What I love about these wraps – besides the obvious deliciousness 🙂 – are the colours. Colourful food makes me smile. If you like them use the sides that I used in this recipe or choose whatever coloured veggies you like. But choose a variety. Reds, greens, purples, yellows… Whatever you find, toss them in!

Use Your Noodles - Turmeric Falafel Wraps + Wholegrain Spelt Tortillas

We’re making a tahini sauce to go with falafels. If you’re a dishwashing maniac like me, stop right now! By dishwashing maniac, I mean insanely washing every dirty dish that I see while I’m cooking. I hate washing dishes after the meal, I’m not crazy 🙂 My point was, there’s no need to wash the food processor after making falafels. Just add the ingredients for the sauce and the liquid will clean it up. Yep, we saved a little time right there 🙂

TURMERIC FALAFEL WRAPS

Prep Time 15 minutes
Cook Time 25 minutes
Total Time 40 minutes
Servings 4 people

Ingredients

FOR THE FALAFEL BALLS

  • 2 cups cooked chickpeas
  • 1 handful parsley
  • 6 cloves garlic
  • 1 small onion
  • 2 tsp ground coriander seeds
  • 1 tsp ground caraway seeds
  • 1 tsp ground turmeric
  • 1/4 cup olive oil
  • salt to taste

FOR THE SAUCE

  • 1 handful parsley
  • 4 TBSP tahini paste
  • 4 cloves garlic
  • 1/4 big medium-hot chili
  • 1/2 cup olive oil
  • 2 TBSP lemon juice
  • black pepper to taste
  • salt to taste

TO SERVE

  • 1/4 medium-size red cabbage
  • 1 big carrot
  • big handful parsley
  • 1 TBSP lemon juice
  • 1/4 cup salted pistachios
  • medium-hot chili slices to taste
  • 8 wholegrain spelt tortillas approx. 15 cm

Instructions

  1. If you are making homemade tortilla wraps (recipe below), make the dough beforehand and leave it to rest while you make the falafels.

Falafel balls

  1. Preheat the oven to 200 °C and line a baking tray with baking paper.

  2. Pulse all ingredients in a food processor until well combined. It should have an almost creamy texture with some small crumbs.
  3. Divide the mixture into quarters. With slightly wet hands, form six balls from each quarter. Wash your hands if they get too messy, otherwise, the mixture will start sticking to them.
  4. Place the falafel balls on the baking tray and bake them for 20-25 minutes or until just slightly golden. These falafels are very delicate, so treat them carefully.

Sauce

  1. In a food processor or a blender combine all ingredients and pulse until the mixture is smooth.

Sides

  1. Chop red cabbage and carrot into thin slices and drizzle them with lemon juice. Chop pistachios and parsley coarsely.

Wraps

  1. Divide the dough into 8, roll them and cook them 30 seconds each side.

  2. Serve falafel balls with sides and tortillas while they are hot.

WHOLEGRAIN SPELT TORTILLAS

Course Appetizer, Side Dish, Snack
Prep Time 15 minutes
Cook Time 10 minutes
Resting time 30 minutes
Total Time 55 minutes
Servings 8 tortillas

Ingredients

  • 1 1/4 cup wholegrain spelt flour
  • 1/4 + 1/8 cup lukewarm water
  • 2 1/2 TBSP olive oil
  • 1/4 tsp salt
  • 1/4 tsp baking soda

Instructions

  1. Combine all ingredients in a bowl, then transfer it to a flat surface and knead it for 5 minutes.
  2. Cover with plastic foil and leave it to rest for 30 minutes at room temperature.
  3. Divide the dough into 8 balls, flatten them with the palm of your hand and roll them out on the lightly floured surface to 15-20 cm in diameter.
  4. Don’t stack the rolled tortillas or they will get soggy.
  5. Brush off excess flour. Cook on a griddle or big pan over medium-high heat for about 30-second each side. If flour starts to accumulate in the pan, wipe it off with a paper towel.

Need more ideas for colorful lunch recipes? Here they are:

Rainbow Cabbage Soup

Spicy Pea Soup

Millet And Carrot Salad with Creamy Almond Dressing

Turkish Chicken Feast

Use Your Noodles - Turmeric Falafel Wraps

PRINT THIS TURMERIC FALAFEL WRAP AND WHOLEGRAIN SPELT TORTILLA RECIPES AND MAKE YOUR PERSONALIZED USE YOUR NOODLES COOKBOOK

(Right click – Open image in new tab

Use Your Noodles - Turmeric Falafel Wraps + Wholegrain Spelt Tortillas

Mini Pumpkin Pizzas

This are seriously delicious pizzas. Even though they don’t have any tomato sauce they are creamy and crunchy. And I’m loving the colours here. Colour means nutrients, right?

Use Your Noodles - Mini Pumpkin Pizzas

Last year I was vacationing in Italy a few times and I must say I fell in love with its people, food and beautiful sights. I was there before, duh (it’s our neighbouring country)! It’s just that my way of visiting a country has changed over the years. I used to travel in a rush, I had to see everything. I even felt a little dissapointed if I missed something out. During my travels I’ve realised that being a tourist shouldn’t mean, you’ve seen all the sights and been to all the places listed in your travel guide. It’s slowing down to have time to observe how people of other cultures interact, what they do, how they talk, what they eat, what they wear. It’s talking to locals and relaxing over a cold beer or a hot cup of coffee. It’s also seeing the nice places, but those that you really appreciate and will stick in your memory.

If I think of Italy and my travels there, I immediately think of pizza and pasta. I know, a cliche. But the fact is that although Italians have a lot of other thing to offer culinary-wise, pizza and pasta are the ones that stick out! You can’t miss those.

Mini Pumpkin Pizzas

Here in Slovenia, the pizzas in restaurants are full of different ingredients. They are totally different than in Italy. Good, but different. If I’m honest, I prefered the ones from Italy. They can make a simple pizza with tomato sauce only feel like you are in heaven. This pizza by the way is now my favourite kind of pizza!

Mini Pumpkin Pizzas

But enough about the Italian pizzas. I’m here to make a totally different pizza with all but the usual ingredients. This pizza does not have tomato or cheese. Think of it more like a winter comfort pizza. Instead of tomato sauce I’m using pumpkin puree flavoured with smoked paprika and oregano. The toppings are chard, chickpeas, capers, sesame, chilli pepper and lemon juice. I assure you these mini pumpkin pizzas are yummy.


Tag #useyournoodles so I can see your beautiful UYN creations. Also, stay in touch on Facebook and Instagram or subscribe to get the recipes directly to your mailbox ♥

MINI PUMPKIN PIZZAS

24 pieces of 10 cm pizzas

Course Appetizer, Main Course, Side Dish, Snack
Keyword pizza dough, spelt pizza dough, wholegrain pizza dough
Total Time 3 hours
Servings 4

Ingredients

PIZZA DOUGH (~400 GRAMS)

  • 3 cups wholegrain spelt flour
  • 1 1/3 cup hot water about 40 °C
  • 1/2 tsp honey or sugar
  • 1 1/2 tsp instant yeast
  • 1 tsp salt
  • 2 TBSP olive oil

PUMPKIN SAUCE

  • 2 cups pumpkin puree
  • 2 tsp smoked paprika
  • 2 TBSP dried or fresh oregano
  • salt
  • black pepper

TOPPINGS

  • 12 chard leaves only greens not stalks
  • 3/4 cup cooked chickpeas
  • 1/4 cup salted capers
  • 3 TBSP sesame seeds
  • 1/2 big medium-hot chili sliced thinly
  • 1 or 2 lemons cut into wedges

Instructions

PIZZA DOUGH

  1. Put the flour in a bowl and make a well in the middle. Pour hot water in the well, add honey and dissolve it in the water. Add yeast to the water and dissolve it.
  2. Then start incorporating flour little by little, until the mixture has the consistency of a soft yogurt (note: not all the flour, just a few tablespoons). Cover the bowl with a cloth and leave in a warm place for 15 minutes, or until the mixture starts bubbling and rising.
  3. Then add salt and oil and start stirring with a wooden spoon from the center and slowly incorporating the rest of the flour.
  4. When the dough stops sticking to the spoon, start kneading in the bowl with your hands.
  5. As soon as your dough starts coming together and you’ve used almost all the flour, you can transfer the dough to a smooth surface. Knead the dough for 10 minutes. If the dough sticks to the surface add a little remaining flour from the bowl. If it does not stick, it is not necessary to add more flour. Because all flours are a little different you might end up with a bit flour left, or you have to add a bit more (but not more than 1/4 cup).
  6. Take another bowl and coat it with oil, then transfer the dough into this bowl and turn it around, so all the sides of the dough are oiled. Cover the bowl with a plastic seal or a plate. Leave it to rise in a warm place for about 1 – 2 hours until it has it is double the size.
  7. When it has doubled, punch it to push the excess air out and knead quickly (only a few kneads). Cut the dough first into four, then into two, then into three. You should end up with 24 tiny dough balls.

MAKING PIZZAS

  1. Roll every ball of dough into circles about 10 cm wide. You can use a rolling pin or the palm of your hand.
  2. Lightly flour the surface and place the pizza circles on it. Cover with a cloth or plastic foil and leave to rise for 30 minutes.
  3. Preheat the oven to 220 °C. Leave the baking tray in the oven, so it also gets heated.
  4. Meanwhile combine the pumpkin puree, smoked paprika, oregano, and salt and black pepper by taste.
  5. In a pan boil the water, add the chard leaves and cook for 1-2 minutes. Take out of the water and cut into smaller pieces.
  6. After 30 minutes take out the tray, cover it with baking paper, and place pizzas on the paper.
  7. Spread the pumpkin puree over the pizza (about 1 TBSP per pizza), top with chard, chickpeas, and capers.
  8. Return the tray to the oven and bake for 10-12 minutes. The dough should be soft on the inside, but crispy on the outside.
  9. When it is baked, take out of the oven and top with slices of chilly and sesame seeds.
  10. Serve with wedges of lemon, so everyone can add as much lemon juice to the top as they want.

Notes

If you can’t get all 24 pizzas in the oven at once, don’t worry, bake it in two or three batches. The remaining flattened dough will wait until the pizzas are done, nothing wrong with that. When the first batch is done, remove the baked pizzas from the tray and repeat it from number 6 (Instructions for the pizzas).
A simple way to make your own pumpkin puree is to cut the pumpkin in half. Season with a little oil, salt, and black pepper and bake at 180 °C until the pumpkin is tender (30 minutes to 1 hour depending on the size of the pumpkin). Then blend.

Mini Pumpkin Pizzas

PRINT THIS RECIPE AND MAKE YOUR PERSONALIZED USE YOUR NOODLES COOKBOOK

(Right click – Open image in new tab)

Mini Pumpkin Pizzas
Use Your Noodles - Mini Pumpkin Pizzas

Millet and Carrot Salad with Creamy Almond Dressing

Millet, carrots, beets, apples and some greens. What else would you need in a salad? Oh yeah, a creamy almond dressing with some fresh chillies. Enjoy my millet and carrot salad!

Use Your Noodles - Millet and Carrot Salad with Creamy Almond Dressing

Happy New Year! I took a short break from my blog during the holidays, but now I’m back.

We abandoned our pretty decorated home to spend some crazy holidays with our friends in a mountain cottage near Velika planina. For my non-Slovenian readers: If you ever come to Slovenia it is absolutely necessary to go see Velika planina. In the late spring I like to rent a cottage up there together with my friends and spend a few days off in the stunning nature. This year we were lucky to be there when the shepherds were bringing cows up to the mountain. It’s a very ineresting day. You can see cows walking on their own from the valley and shepherds bring cows up on their trailers. It’s a very lively sight! Plus I love this place for picking wild herbs.

Millet and Carrot Salad with Creamy Almond Dressing

Me and my husband absolutely love millet. And by love I mean can’t go without it. So I created this beautiful millet and carrot salad with a nice and creamy spicy almond dressing. For an additional kick and sweetnes I added beetroot and apples and fresh baby salad leaves for some freshness. It’s a quite filling salad, perfect in this winter weather.

Note that the beetroot in this recipe is raw. I know many people don’t like raw beetroot, but if you slice it very thinly it doesn’t have such a powerful earthy taste. I happen to love the earthy taste, but if you are sure you can stand it, you can roast the beetroot before adding it to the salad. Just wrap it in foil and bake for an hour at 200 °C (400 °F). See more instructions on The Kitchn.


Tag #useyournoodles so I can see your beautiful UYN creations. Also, stay in touch on Facebook and Instagram or subscribe to get the recipes directly to your mailbox ♥

MILLET AND CARROT SALAD WITH CREAMY CASHEW DRESSING

Prep Time 25 minutes
Total Time 25 minutes
Servings 4

Ingredients

MILLET AND CARROT SALAD

  • 1 cup millet
  • 2 cups water
  • 1/4 tsp salt
  • 1 big carrot
  • 1 medium-size beetroot
  • 2 medium-size green apples Choose a juicy and sour type. I’m using Granny Smith.
  • 4 handfuls baby leaf salad like lettuce, chard, rocket or any other

CREAMY ALMOND DRESSING

  • 1 cup almonds soaked overnight
  • 1/2 cup lemon juice
  • 1/2 cup water
  • 1 tsp chopped chili pepper I’m using a bigger medium-hot chili pepper
  • 1 1/2 tsp salt
  • 1/2 tsp black pepper

Instructions

SALAD

  1. Boil 2 cups of water and pour it into a small pot. Add millet and salt and stir. Set your stove to low heat and cover the pot. Leave to cook for about 15 minutes, checking every now and then, but not stirring. If the millet is still not tender to add a little more boiling water and cook a few more minutes. When it is soft remove from the heat, transfer it to the serving plate or bowl, and leave to cool a little.
  2. Meanwhile, prepare the dressing (Instructions below) and cut the carrot and beetroot into very thin slices. Cut apples into 1 cm cubes.
  3. When the millet has cooled a little, mix in carrot, beetroot, and apples. Top with fresh baby salad and dressing.

DRESSING

  1. Rinse the almonds.
  2. Put lemon juice, water, chili pepper, salt, and black pepper into a blender and mix until the dressing is smooth and creamy.

Notes

You can do the same dressing with any other nuts. I like almonds and cashews because they are sweet and go really well with millet.
If the millet is hot when you add the baby salad leaves, they will wilt, so make sure it is warm or even cool.

Use Your Noodles - Millet and Carrot Salad with Creamy Almond Dressing

Rainbow Cabbage Soup

The amazing colours come from squeezing lemon juice into the delicious red cabbage soup.

Use Your Noodles - Rainbow cababge soupI’m waiting for snow to fall again. Until that happens I have to settle with cold and sunshine, which I like almost as much as snow. In good weather like this we all deserve a healthy and colourful meal like I’m about to show you – a rainbow cabbage soup.

Rainbow cababge soup

I’m so happy to be sharing this recipe with you. Red cabbage is in season right now, so there’s lots everywhere. It’s loaded with vitamins and minerals. And according to Science Daily it promotes heart and brain health and protects us from cancer. So yay for us cabbage lovers and the ones who will become cabbage lovers after tasting this soup. I feel like red cabbage is so underrated. Here in Slovenia we eat it mostly braised a side dish or in salads. But it is magnificent in a soup as well. The rainbow cabbage soup is quick and simple and sooo delicious. Squeezing in few drops of lemon juice gives it wonderful vibrant rainbow colour. When I first tried squeezing lemon on this soup I was pleasantly surprised by this amazing reaction. I realised that it is not just super tasty but also fun. And that’s the point of cooking. To have lot’s of fun!


Tag #useyournoodles so I can see your beautiful UYN creations. Also, stay in touch on Facebook and Instagram or subscribe to get the recipes directly to your mailbox ♥

RAINBOW CABBAGE SOUP

Course Soup
Total Time 15 minutes
Servings 4

Ingredients

  • 1 medium-size cabbage 400g
  • 1 big onion
  • 4 cups hot water
  • 1/4 cup milk
  • 1 TBSP lard
  • 1 tsp fresh citrus thyme leaves
  • salt
  • pepper
  • 4 lemon wedges

Instructions

  1. Chop the onion into small pieces. Melt lard in a medium-size pot and add the chopped onion. Fry the onion until it gets golden and translucent.
  2. Meanwhile cut the cabbage in half and then into thin slices. Add them in the pot. Add the hot water and thyme.
  3. Cook for about 10 minutes until the cabbage is soft.
  4. Remove from the stove. Put everything in a blender, add milk, salt, and pepper and mix well. Taste for seasoning before serving.
  5. Squeeze a few drops of lemon juice onto the soup for the wonderful color.

Also try this easy 5 minute soup:

Spicy Pea Soup

Use Your Noodles - Rainbow cababge soup

Curried Squash Kebabs

These squash kebabs are great for a light asian inspired lunch or dinner. There’s a coconut milk sauce with fish sauce and cilantro to top it off.

IMG_6420 (Custom)

Squash or pumpkin? I was a a bit confused on how to name this tasty orange fruit. I did some research and apparently botanically squash is the right term. However in different countries pumkin is used for certain types of squash. I decided this is too confusiong for me. So I’m going to use the term squash for this recipe. Probably if I make a squash pie one day, I’ll name it pumpkin pie since we hear this more often. Luckily Slovenians only have one word for squash and pumpkin – buča.

Why not make squash more fun. And what’s more fun than kebabs? Add a little asian spices and a fishy coconut milk sauce and you’re on fire! I am using my Hot Curry Spice Blend in this recipe. You can find the recipe here.

Curried Squash Kebabs

Tag #useyournoodles so I can see your beautiful UYN creations. Also, stay in touch on Facebook and Instagram or subscribe to get the recipes directly to your mailbox ♥

CURRIED SQUASH KEBABS

Course Appetizer, Side Dish
Total Time 50 minutes
Servings 4

Ingredients

KEBABS

  • 2 kg squash any kind you like
  • 4 TBSP olive oil
  • 2 tsp salt
  • 8 tsp Hot Spicy Curry Blend
  • 2 TBSP coarsely chopped cilantro

FISHY COCONUT SAUCE

  • 1/4 cup coconut milk
  • 2 TBSP fish sauce
  • 1 tsp finely chopped cilantro

Instructions

  1. Preheat the oven to 220°C (430 °F).
  2. Peel the squash and chop it into 2 cm cubes. Divide the cubes between skewers.
  3. Drizzle with oil and sprinkle with Hot spicy curry blend. Use your hands to really get that spice in every corner.
  4. Put them in a baking tray and roast for 30-40 minutes (or until the squash is tender).
  5. Meanwhile, prepare the sauce. Mix all ingredients together in a small bowl.
  6. When the kebabs are done, pour over the sauce and sprinkle with chopped cilantro.

IMG_6399 (Custom)