Delightful spring mocktail – roasted peach and strawberry fizz!
Yey, so excited about this recipe!!!
This drink to me is like pie. You know the feeling, when you take out a pie and all the syrupy juices are sizzling around the fruit? And the smell… so good 🙂 This is like a pie in a glass 🙂
And I love it!
This roasted peach and strawberry fizz is soooo simple. Sometimes, I can’t belive, how many great thing you can do, with so little. This is definitely one of them! 🙂
All you’ll need to do is cut peaches and strawberries in half, roast them and blend them. Then add a little apple juice, preferably homemade or organic, and some sprakling water. And there it is.
A perfect spring drink!
While we’re on the spring subject. Spring has been awfull this year in Slovenia. Ugh, my tomato, pepper and chilli plants are barely holding on in thir tiny cups, just waiting to be planted outside.
But its so COLD. I mean, I make drinks like this, just to feel like it’s spring. It’s a crime!
But good news… Today it is sunny and we’re having a big picnic party for my brother’s and friend’s 30th birthday.
Lots of people, lots of good food, beer, friends. That’s what I call spring. Hopefuly, the weather will hold and let us have the party we deserve 🙂
Tag #useyournoodles so I can see your beautiful UYN creations. Also, stay in touch on Facebook and Instagram or subscribe to get the recipes directly to your mailbox ♥
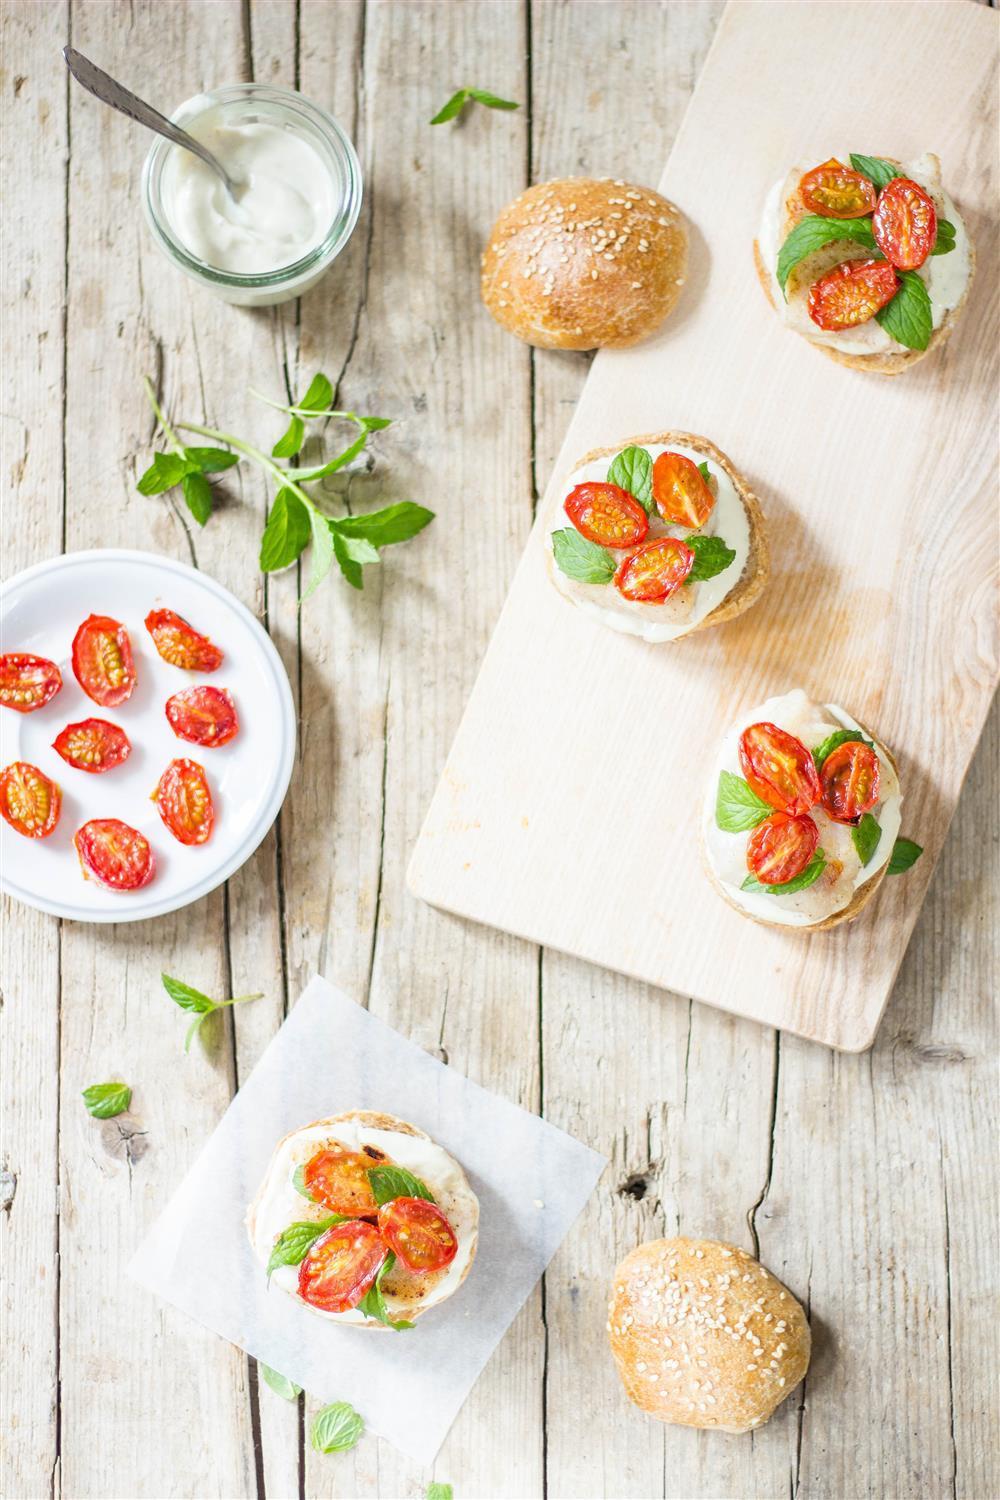
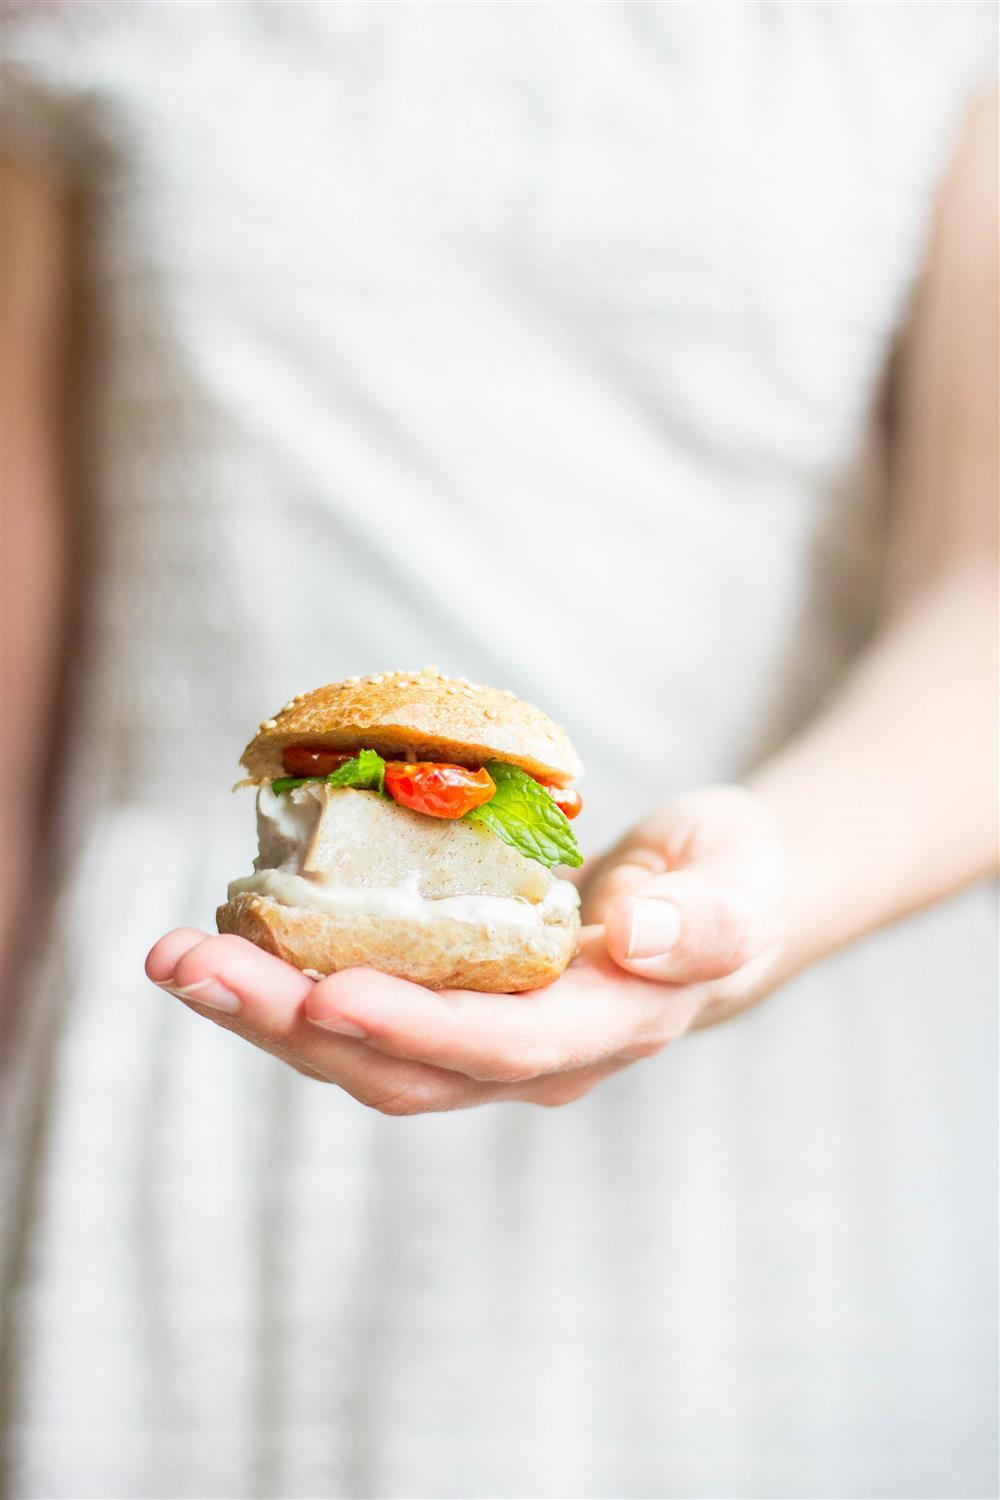
Humble fish sliders with a little twist are the best way to treat your family!
Oh, who am I kidding. They are actually a treat for you. Others can watch and be jealous 😉 And if they behave, they get a bite!
I’m declaring my love to fish.
I’d choose fish over meat in almost any given situation. They are so tender and delicious. One thing I hate, though, is dry overcooked rubbery fish. Yuck, bring me a glass of water, please!
The beautiful thing about these fish sliders is that you can use any fish you like. This one in the photos is perch, but any white fish or other type would work perfectly.
Ask for a filet and make sure all the bones are out, before cooking it. You don’t want to bite into one. I don’t own a fish bone tweezers, so I use regular tweezers and they work just fine.
This is a dish, that takes some time, but basically no effort or special cooking skills… read a book or dance around the house, and in the meantime it’s all cooking. At the end quickly blend the sauce and cook the fish and you’re done. Suuuuper easy! I promise 🙂
I used to be so scared about preparing fish, what if they get stuck on the pan or are undercooked or even soggy. So I avoided making them. But after a few tries, I realised, that they are so easy to work with. Also so much faster to check if they are done or not, than meat. The flaky flesh allows that.
If you want it to be crispy on the outside, sprinkle with some flour or starch. It will pull out a little moisture from fish and form a really thin layer of batter, which will fry crisp in the pan.
Have you ever tried roasted garlic? Before trying these fish sliders, I added separate unpeeled garlic cloves to my roaseted veggies and they turned out o be the most delicios part of the meal.
So I decided to use garlic in a different way. Roast it and make it in a yummy sauce!
I noticed how people are roating whole garlic heads. So, I tried that. Just cut of the top of the garlic head, sprinkle a little oil over, wrap entirely into aluminium foil and roast until it’s soft and fragrant. One of the garlic heads fell apart while I was removing the top, but it roasted as well as the others.
So, that’s it. The final fun part is squeezing the soft garlic out of the peel.
You can use roasted garlic in many ways. I promise, I’ll do more recipes with it, because it’s awesome!
I topped the fish sliders with roasted tomatoes. Again – a little oil, salt and pepper. Throw in the oven and forget about it for half an hour. They add sweetness to the sliders. Top with some mint – I used peppermint, but any would do.
I’m usually the one to complain about lack of crunchiness in burgers, but I’m so into this delicate fish, that I actually prefer not biting into anything hard and spoil the enjoyment 🙂 You can add some chopped nuts or seeds, of course.
Let’s go eat!
Tag #useyournoodles so I can see your beautiful UYN creations. Also, stay in touch on Facebook and Instagram or subscribe to get the recipes directly to your mailbox ♥
Peel away the outer skin of the heads of garlic. Trim away about 0.5 cm of the top, so all cloves are exposed. Place the two heads on separate aluminum foils, sprinkle the exposed parts with olive oil, and wrap in the foil entirely. Roast for 30 – 40 minutes until they are golden and soft.
Roasted tomatoes
Cut cherry tomatoes in half, place them on a baking tray. Sprinkle with olive oil, salt, and pepper. Toss around, to coat them entirely with seasoning. Reduce the oven temperature to 190 °C and roast for about 30 minutes, until they are fragrant and have shrunk a little.
Roasted garlic sauce
Squeeze out the soft parts of garlic into a food processor. Add crème fraîche or Greek yogurt, lemon juice, salt, and pepper. Blend until the sauce is smooth.
Fish
On a big plate sprinkle the fish with flour, salt, and pepper. Move them around the plate, so they get coated on all sides evenly.
Over medium-high heat fry the fish on a tablespoon of oil, 3-4 minutes each side, depending on the thickness.
Assembly
Cut the buns in half, spread on the sauce, add one fish piece per bun, top with mint leaves, and roasted tomatoes. Serve immediately.
Refreshing fruity peach and celery ice lollies on sticks are always welcome at our house!
I bring you summer… on a stick. It’s not a joke!
I hope, wherever you’re from, you’re having a hot summer weather. It was crazy here over the last ten days. We’ve had all weather imaginable. Snow, sleet, fog, rain, sun, wind… We planned to escape to Sarajevo during the holidays, but it was covered with snow, so we’re saving the trip for warmer times.
It took me about two days to get comfortable with doing nothing and switching to my off mode. But then it was actually kinda nice to lay back, watch some TV and not feel guilty, go walking in the snow and then biking to a nearby mountain the next day, watching the 1st of May bonfire, and squeeze in a little dance practice. It was all good 🙂
Now, to the recipe already!
I remember having ice lollies in a long plastic wraps, when we were little. For the first few moments it tasted delicious and sweet, but then after we sucked all the juice out, we were left with a block of flavourless ice. How dissapointing! That’s not the case with this lolly – all flavour, no tasteless icy leftovers.
These peach and celery ice lollies are so easy to make and it’s a nice way to get yourself or the kids to eats more fruit. Cuz, who doesn’t like an icy treat, am I right?
The idea for this recipe actually came from my husband. He said, why not pair a fruit with some unexpected greens, like celery. So we did, and boy was he right. It tastes amazing! I’m not exaggerating. This combo works so well.
Give it a try!
All that’s required is to blend all the ingredients and pass the mixture thorugh a sieve, to give it the silky texture. Wait a few hours until the lollies set and you got yourself a fruity refreshment 🙂
Tag #useyournoodles so I can see your beautiful UYN creations. Also, stay in touch on Facebook and Instagram or subscribe to get the recipes directly to your mailbox ♥
These sweet potatoes are filled with a cheezy pizza stuffing. A perfect way to make pizza without the crust!
Pizza is one of my favorite foods. I can eat it in any form, regular crust, cauliflower crust, loaded with cheese or only with a deliciously simple tomato sauce. You name it, I eat it!
Sweet potatoes go into same category. I can eat it whenever, breakfast, lunch, dinner or midnight snack 😉
So this week I’m bringing those two together. In the shape of a decadent pizza stuffed sweet potatoes. Are you excited? I sure am!
We’ve been working hard on our dance show, which will premiere in a month. If you are interested in how it looked the previous years, go see Tribal Bizzare site. As you would imagine, we’re spending a lot of time practicing, sewing costumes and making props for the show. It’s an exciting time! Stresfull, but fun at the same time. If you’ve got some interesting hobbies of your own, I’d love to hear about them in the comments 🙂 🙂 🙂
Ok, back to the sweet potatoes! This recipe is a little quicker that the usuall stuffed sweet potatoes. I cut the potatoes in half before baking, which shortenes the baking time and it makes the top of the sweet potato flesh even sweeter. After it is baked I mash the flesh and add A LOT of stuffing, then press it in the potato, so I can add some more on the top. Haha! These here, look almost roud, I pressed so much stuffing in. But that’s ok, right?
Sweet potatoes are basically quilt-free comfort food. All sweet and yummy, but with a low IG and loads of vitamins and minerals.
I love the fact that we can eat the skins. When I was a child, my mum would allways peel the potatoes (note: sweet potatoes were nowhere to be found in Slovenia at that time). We’d only eat the spring potatoes with the skin still on, otherwise it was chopped off! Later I realized that the skins are actually the best part of a potatoes. ♥ It goes the same with sweet potatoes.
Tag #useyournoodles so I can see your beautiful UYN creations. Also, stay in touch on Facebook and Instagram or subscribe to get the recipes directly to your mailbox ♥
A cold grapefruit-lime cocktail with ginger and rosemary to take you to your favourite beach!
Have you ever sat down in a nice cozy chair on a sandy beach somewhere far far away, having a waiter bringing you a cocktail whenever you ran out of the previous one. If your answer is YES – you’ve got my admiration and a bit of jealousy 😉 . I haven’t done that yet, but it is on my THINGS-TO-DO-BEFORE-I-DIE LIST. Until then, I’m making my own coctails, or if I’m feeling extra adventurous, I’ll go out and order a mojito!
This cocktail I’m showing you today is not a mojito, but it also contains white rum. Yum, right?
Well, being a fan of sunny days and cold drinks, it’s kinda hard to watch out of my window. You guessed it right – it’s raining. Blah…
Luckily, I have a whole fridge of these delicious grapefruit-lime coctails in my fridge.
Let me tell you, where the hidden trick is. It’s all in the ginger and rosemery syrup. It’s a syrup that you can prepare in advance and keep in the fridge for a week, so you’ll have it on hand, whenever you feel like having a drink. It’s a pretty simple syrup. You boil the water with ginger and rosemary let steep and add some honey.
I’m not a fan of super sweet cocktails, unless that’s because of the actual sweetness of the fruit. I normally use honey or unrefined cane sugar, because I love how they make everything taste caramely.
Why do I love this recipe so much? Because it is as delicious in a mocktail version as in the one shown in the recipe. Simply omit white rum or replace it with sparkling water and you got yourself an everyday treat!
Are you thirsty already? I sure am! 🙂
Tag #useyournoodles so I can see your beautiful UYN creations. Also, stay in touch on Facebook and Instagram or subscribe to get the recipes directly to your mailbox ♥
Cut ginger in thin slices and vigorously roll rosemary between your hands. Place them in a small saucepan and add 1 cup of water. Cover and bring to a boil, then remove from heat and leave to steep for 20 minutes.
After 20 minutes add honey.
Grapefruit-Lime Cocktail
Pour grapefruit and lime juices in 4 glasses. Add ice, almost to the top of the glass. Pour over the ginger and rosemary syrup, and white rum.
Decorate with stems of rosemary and slices of grapefruit.
Notes
The recipe for the syrup is for 4 glasses. If you are making a batch, you can multiply it.
Mocktail version: Omit the white rum or replace it with sparkling water.
https://www.useyournoodles.eu/wp-content/uploads/2016/04/grapefruitlimecoctail3-Custom.jpg15001000Anja Burgarhttps://www.useyournoodles.eu/wp-content/uploads/logo_NEWW.pngAnja Burgar2016-04-14 08:51:332020-08-26 11:00:50Grapefruit-Lime Cocktail with Ginger and Rosemary
An excelent way to use leftover fish or you can make it from scratch – beautiful sardine pâté. It takes literally no time and it tastes very fancy!
Hi, there! It’s been a while and it felt even longer. I’ve been a busy busy bee. Among other daily work I’ve had the privilage to spend some time in my favorite place of ’em all – the forest.
Mmmm, the fresh smell of moss and spring flowers, and the birds singing in the trees. I could be there all day! Luckily the weather has been nice and warm so we went hiking to a nearby mountain. We love going there this time of the year, because the slopes are completely covered of wild garlic. We get all crazy and eat tons of wild garlic right there, freshly picked.
Today I’m sharing with you a recipe, that you are gonna love, because it will show you a wonderful way to use leftover fish.
I hate throwing food away, I’m sad when – very rarely – my food goes bad. This is the recipe I created for when I’m left with cold fish from lunch. Cold fish to me is … meh. Not very appetizing. I mix it up with spices and tomatoes and virgin olive oil and it turns into posh food 🙂 How about that!
For this recipe you can go two ways. Use leftovers or cook fresh fish. Both of those ways are super quick.
I’ve even prepared a little idea for how to use sardine pâté. Sardines go really well with eggs and like all fish – with garlic. Since it is spring and I’ve been telling you about my wild garlic obsessions, I’m adding that too 🙂
Tag #useyournoodles so I can see your beautiful UYN creations. Also, stay in touch on Facebook and Instagram or subscribe to get the recipes directly to your mailbox ♥
Add 1/4 cup virgin olive oil, garlic, tomato purée, dijon mustard, dried tomatoes, oregano, sweet pepper powder, black pepper, cayenne pepper, and lemon juice into a food processor and blend well. Add the rest of the oil if necessary to get a smooth paste. Salt to taste.
Keep in the fridge, but take out half an hour before serving.
Notes
If you are using fresh sardines, dry them first. Fry them in a pan with a little oil 2 minutes on one side, 1 minute on the other. Transfer to a cold plate and wait for five minutes to cool down a little, debone and use like leftover sardines.
Crack the eggs in a jug, add a pinch of salt and pepper, and beat them together with a fork.
Heat a pan over medium heat, add oil and eggs, and stir slowly with a wooden spatula until the eggs are soft and almost a little undercooked. Remove from heat. The eggs will continue cooking in the hot pan while you prepare the sandwich.
Cut the baguette into 1 cm thick slices and spread the pâté over.
Divide the scrambled eggs between the slices and top with chopped wild garlic leaves and chilly flakes.
This light and fresh strawberry layer cake is a perfect healthy indulgence for the sunny spring days!
First thing that comes to my mind when I think of spring is fresh fruit. Strawberries and cherries to be exact. Red is one of my favourite colours. So passionate and warm. So for this spring dessert the choise was quite obvious – strawberries.
A few weeks ago first slovenian culinary & lifestyle magazine Redegunda asked me to make a reinterpretation of a traditional Slovenian dessert. Now, if you recall me mentioning that Slovenian cuisine is mostly heavy with lots of carbs and fats, you’ll imagine it’s not easy making a light dish. I took traditional Slovenian dessert prekmurska gibanica (which is delicios by the way!) and made it into a lighter fresher and healthier dessert that you can make very quickly with almost no cooking.
Prekmurska gibanica is a layer cake has 4 layers, with phyllo pastry between them:
poppy seed layer
cottage cheese layer
wallnut layes
apple layer
I kept the four layers, but changed the ingredients quite a bit. Instead of cottage cheese I used honey and greek style yoghurt. I replaced wallnuts with hazelnuts and almonds and roasted them to make a crumble. Since it is almost spring I ditched the apples and added some fresh strawberries. That’s it. Soooo simple, but even more delicious 😀 Plus, you can showcase your lovely glassware!
Now let’s enjoy the Easter holidays, get the dishes dirty and have a strawberry layer cake!
Tag #useyournoodles so I can see your beautiful UYN creations. Also, stay in touch on Facebook and Instagram or subscribe to get the recipes directly to your mailbox ♥
Keyword
dessert in a glass, layer cake, quick dessert
Prep Time40minutes
Cook Time5minutes
Total Time45minutes
Servings6desserts
Ingredients
HAZELNUT LAYER
75ghazelnuts
45gground almonds
20gbutter
50g/ 3 TBSP honey
1tspdried thyme
POPPY SEED LAYER
145gground poppy seeds
100g/ 6 TBSP honey
180mlmilk
STRAWBERRY LAYER
300gstrawberries
YOGHURT LAYER
400gGreek-style yogurt
65g/ 4 TBSP honey
Instructions
Hazelnut layer
Chop the hazelnuts coarsely. In a skillet fry chopped hazelnuts, ground walnuts, butter, honey, and thyme for a couple of minutes, until they become golden. Stir every 10 seconds. Remove from the heat and stir for another minute, then transfer the mixture to a big plate and lay it out evenly. Wait until it cools down.
Poppyseed layer
Boil milk and pour it over poppy seeds. Add honey and mix well.
Strawberry layer
Cut strawberries into very small pieces of approx. 0,5 cm.
Yogurt layer
Add honey to yogurt and mix well. If you are using crystallized honey, melt it over a saucepan of simmering water.
Assembly
Take six 2 dl glasses and divide half of the poppy seed mixture on the bottom. Continue with half of the strawberries, yogurt, and hazelnuts mixture. Continue with the other half of the mixtures.
Serve immediately or cool in the fridge and serve later.
https://www.useyournoodles.eu/wp-content/uploads/2016/03/springlayercake1-Custom.jpg15001000Anja Burgarhttps://www.useyournoodles.eu/wp-content/uploads/logo_NEWW.pngAnja Burgar2016-03-25 09:53:202020-08-26 11:09:06Spring Strawberry Layer Cake in a Glass
St Patrick’s day is coming closer and we’re making yummy gooey Guinness caramels with salted peanuts. If you don’t know what to snack on while drinking beer – sweet or salty – you can have have both!
With St Patrick’s Day just a couple of days away I thought I’d share these gooey Guinness caramels with you. Before I decided I want to do something sweet with Guiness I’ve never made caramels before. Experimenting and lots of tasting has brought me to this amazing recipe.
Beer… A few years ago Slovenia has known mostly lagers. You could get Guinness and a couple of other non-lager beers, but that was it. Now it’s like spring here with new beers blooming all over the place. Which is kind of nice, because I was getting tired of the same old same old. Now there’s so much to choose from, but for these caramels Guinness is the right choice.
With the rich caramel flavour it enhances the sweetness of the caramels and adds just a little bitterness. Peanuts and salt add another layer and the saltiness bring out even more sweetness. I know it sounds strange, but caramels without salt don’t do it for me.
Before trying for the first time I was a bit scared. I was sure I was going to fail. But making caramels is actually unbelievably easy. There’s not even any doing, there’s mostly waiting 🙂 So don’t be scared like me and go for it!
If you don’t have a clip-on candy thermometer I suggest investing in one, it’s not that expensive and candy-making will be so much easier and precise.
But if you don’t have one and still wanna make some delicious Guinness caramels you can do it without the thermometer and test if the caramels have reached the hard ball stage with the water test.
Now, let’s do this 🙂
Imaginary-glass-full-of-Guinness-caramels cheers!
Tag #useyournoodles so I can see your beautiful UYN creations. Also, stay in touch on Facebook and Instagram or subscribe to get the recipes directly to your mailbox ♥
Butter the sides and the bottom of a 25×18 cm (10×7 inch) pan and line it with baking paper.
In a saucepan (2 l or more) reduce Guinness over medium-low heat to 1/2 cup. This will take about 30 minutes.
Add butter and melt completely. Add whipping cream and sugar. Stir until well combined.
Place in a sugar thermometer. Don’t stir from this point on.
Over medium-low heat cook until the temperature reaches somewhere between 118 °C and 121 °C (245 °F – 250 °F). This will take about 25 minutes or more, but keep an eye on the caramel all the time, because at the end the temperature will rise quickly.
Remove from heat immediately.
Stir in salt and peanuts and pour into the baking tray.
Refrigerate for an hour.
With a sharp knife cut into desired size pieces.
Store at room temperature.
Notes
Keep in mind that when the sugar starts heating it will expand to two or three times the volume, so adjust the saucepan size. But don’t use a saucepan that’s too large, as your thermometer will not be submerged and won’t show accurate temperature. If you double the recipe, adjust the pan!
I cut my caramels into 3 cm squares and wrapped them into 10x12cm baking paper pieces.
https://www.useyournoodles.eu/wp-content/uploads/2016/03/guinesscaramels4-Custom.jpg15001000Anja Burgarhttps://www.useyournoodles.eu/wp-content/uploads/logo_NEWW.pngAnja Burgar2016-03-15 08:57:332020-08-26 11:11:34Guinness Caramels With Salted Peanuts
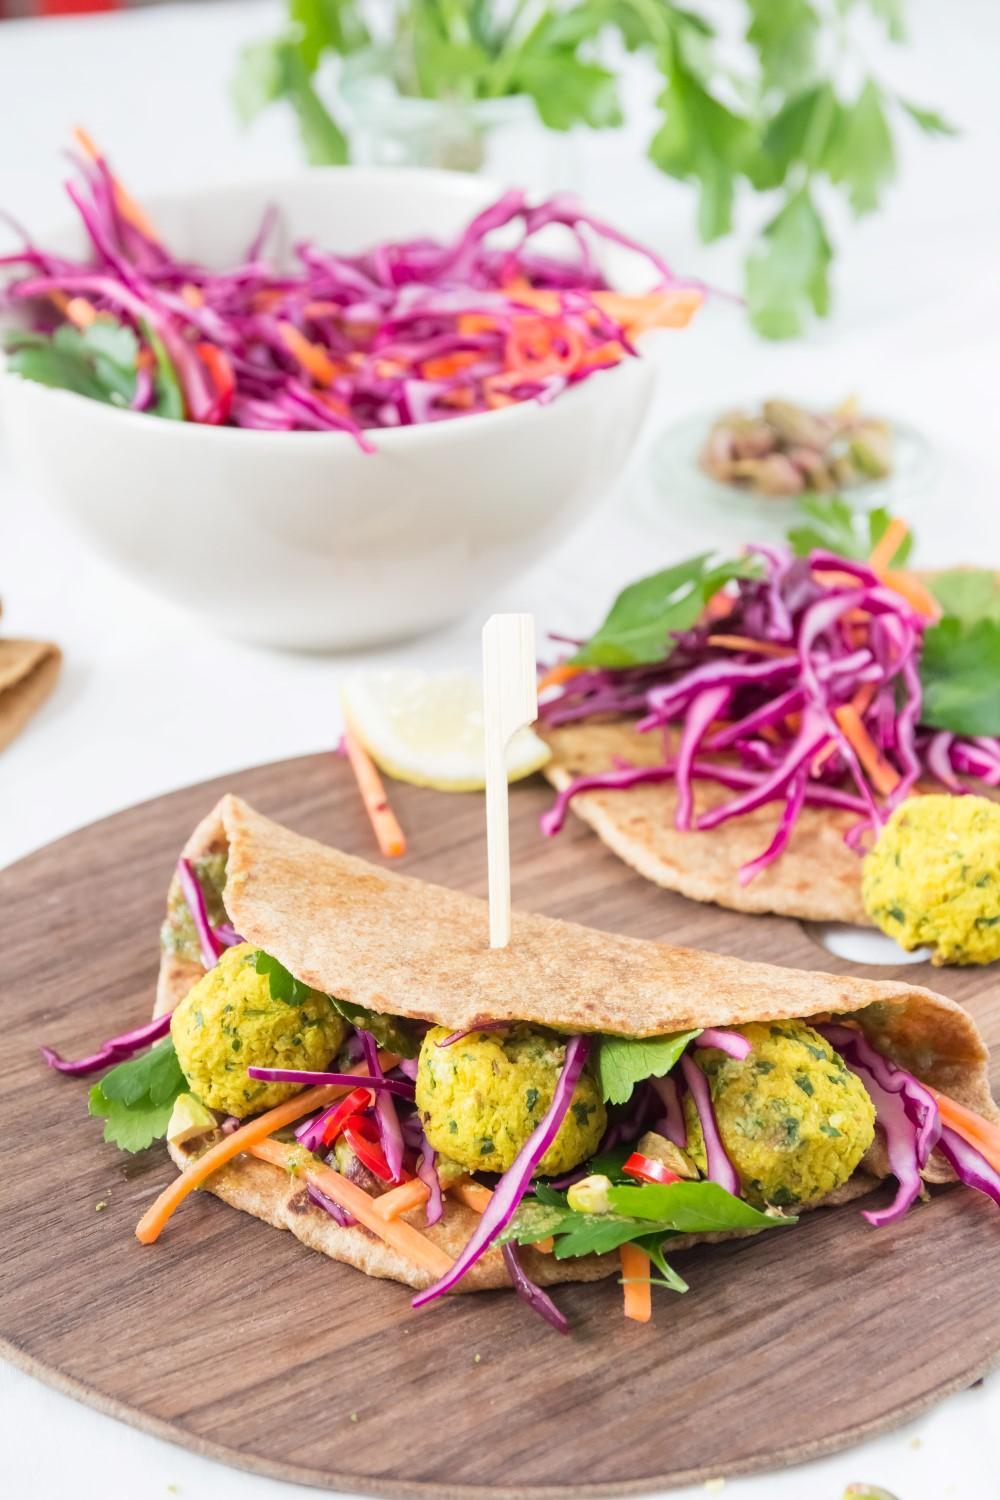
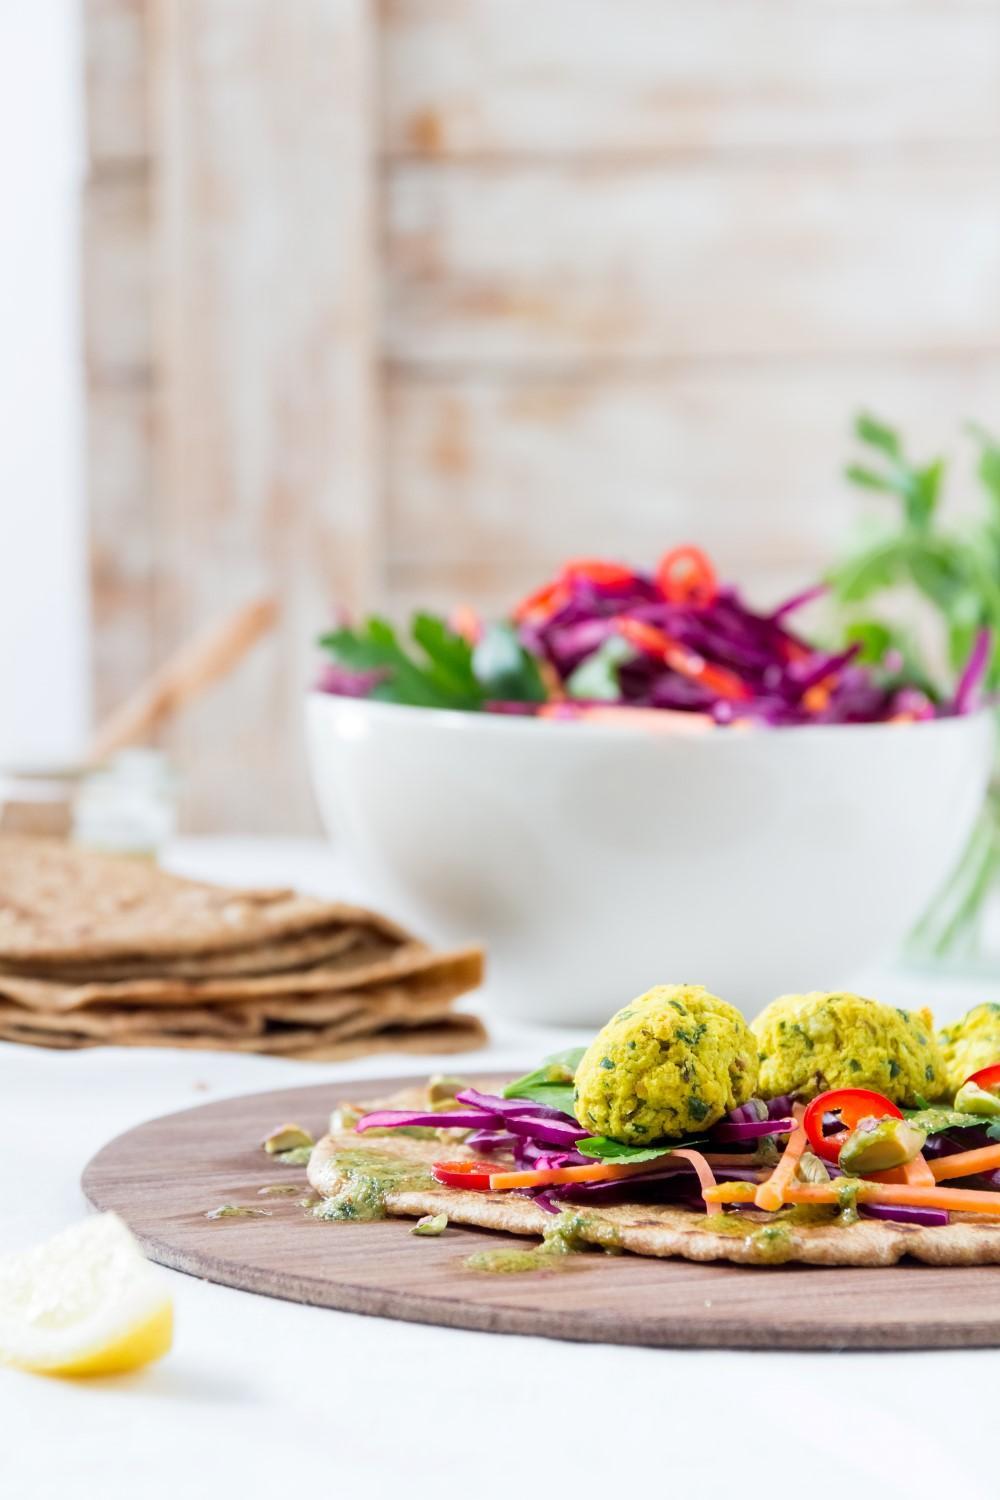
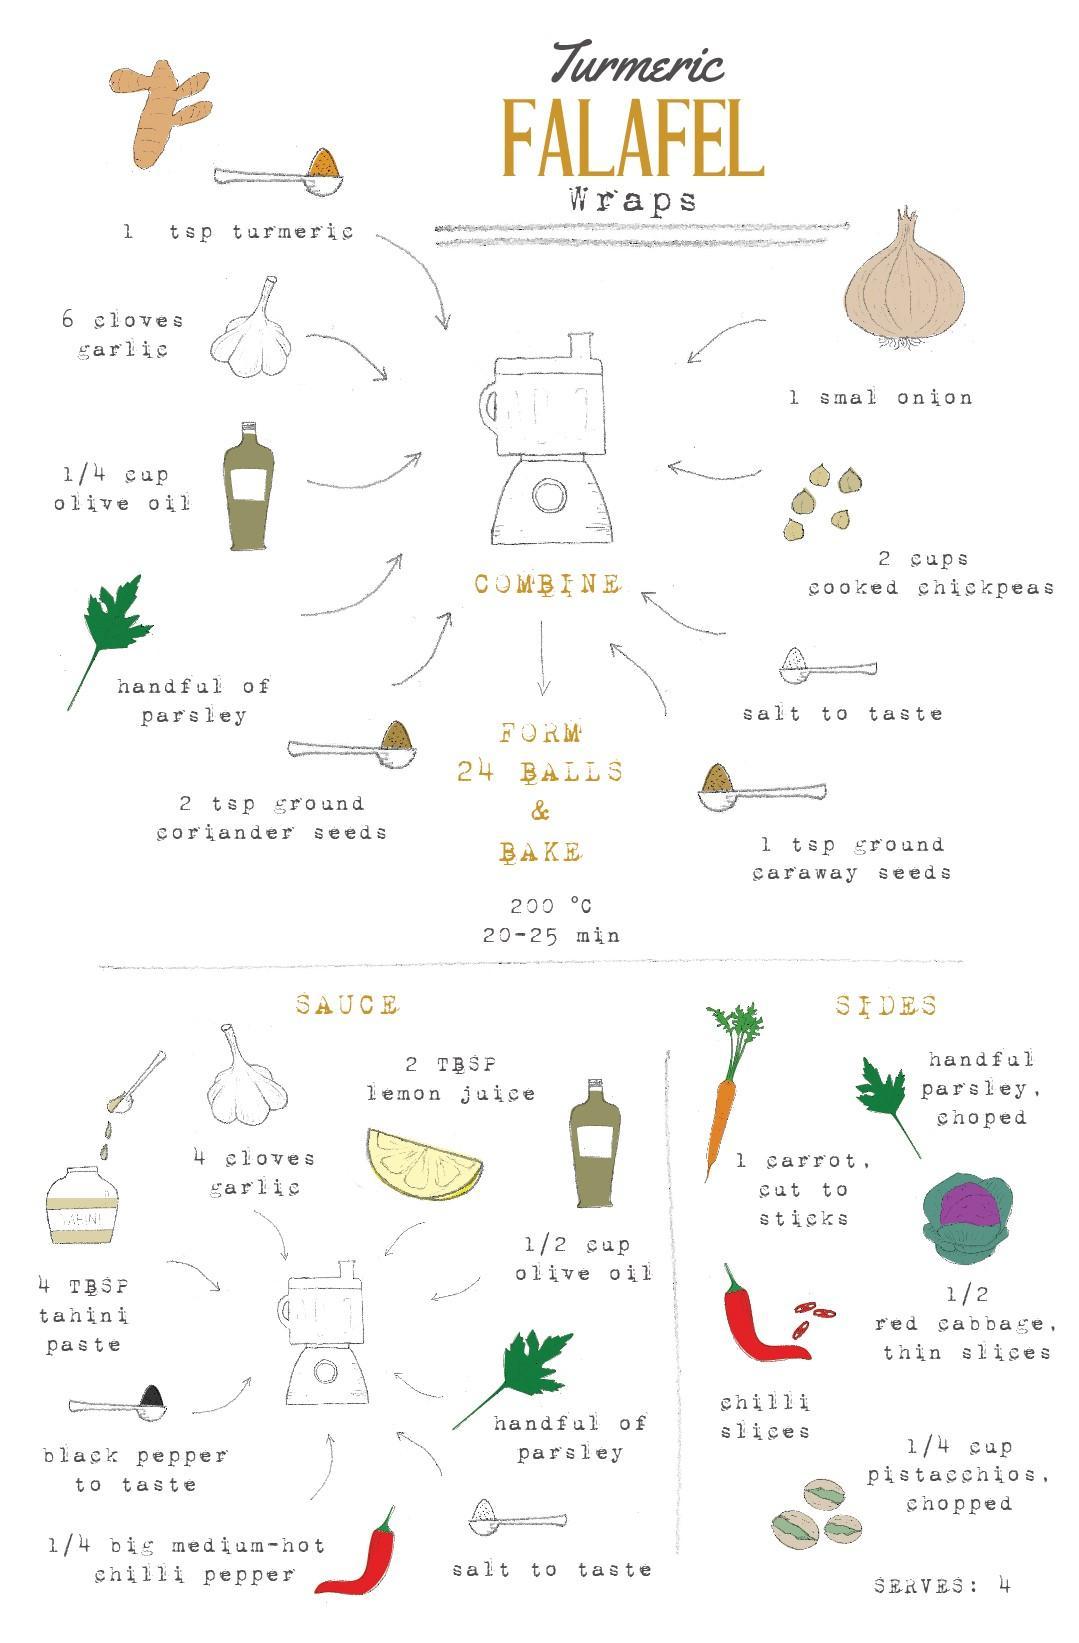
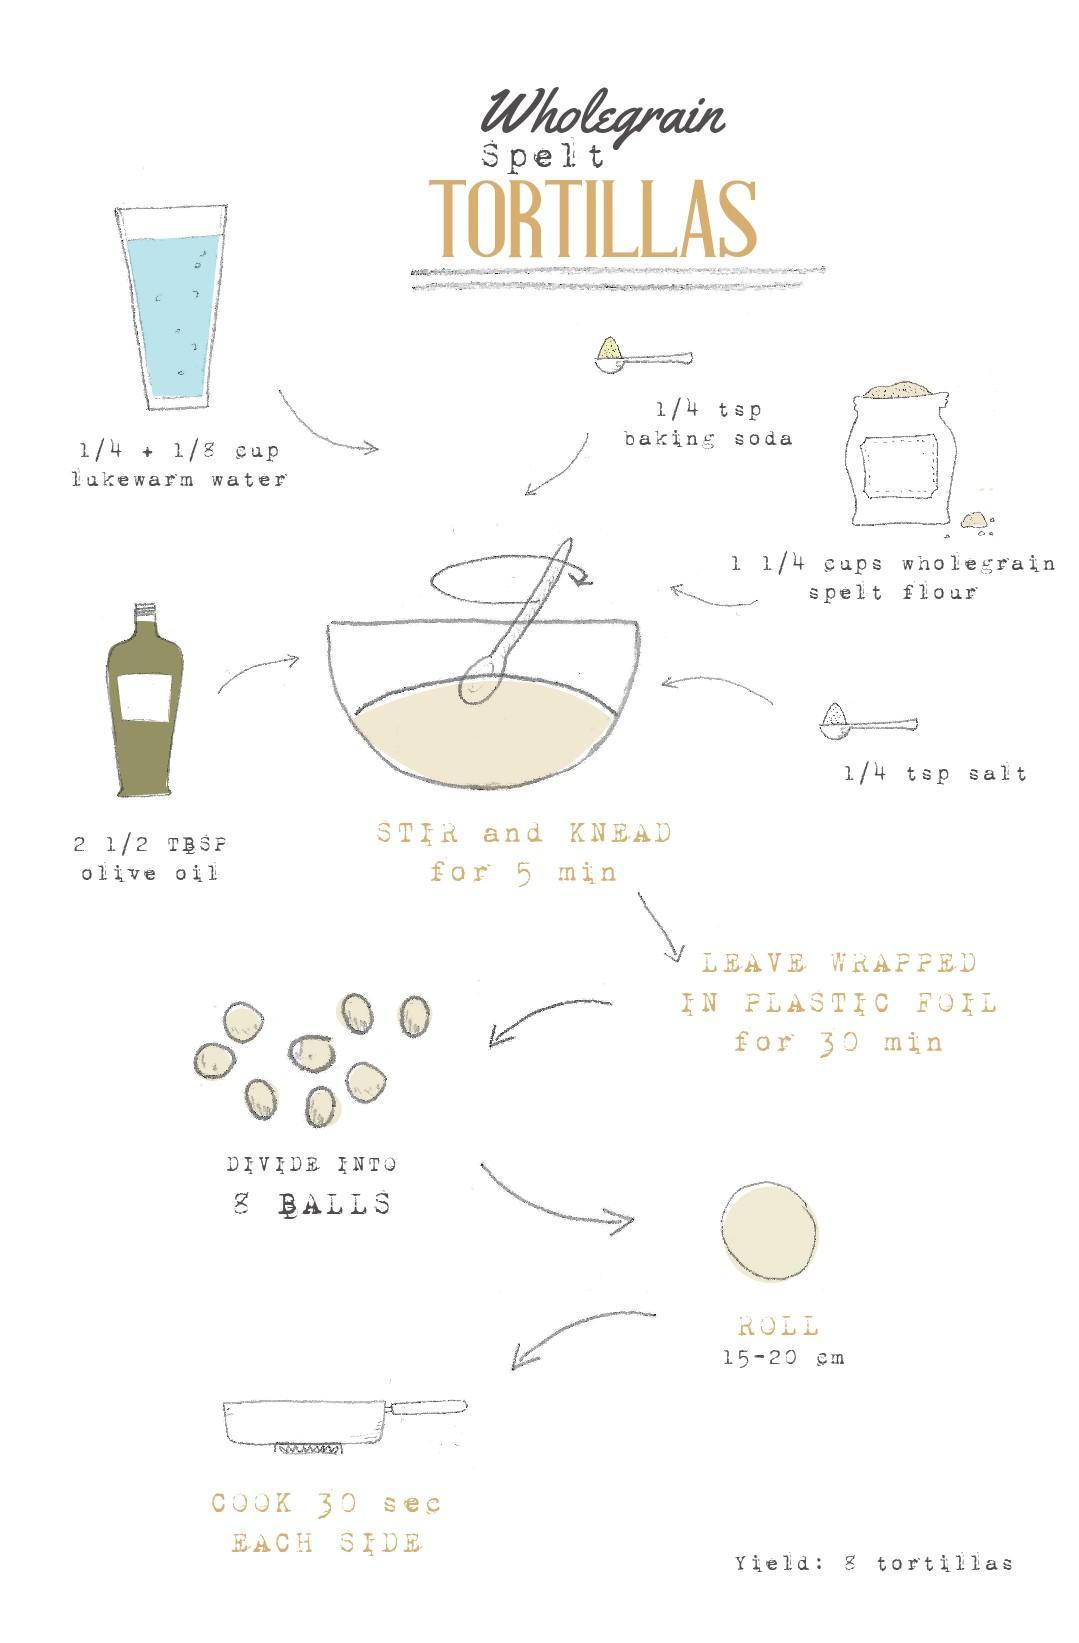
Fresh and healthy lunch with lots of colours to fill our daily rainbow – turmeric falafel wraps! And my favourite recipe for homemade wholegrain spelt tortillas!
It’s March!!! Hmmm, it’s been March for more than a week, but my brain just grasped that.
Ah, I love March. Why? Because I start growing my veggies from seeds. I first tried it three years ago and I produced some tomatoes, but the plants were looking a little sad and small. Last year, though, it’s been incredible. I’ve produced toooo many tomato plants (not enough space in the garden) and added bell peppers and chilies. The summer was unbelievably sunny and warm and we had a gazillion of homemade tomatoes and chilies. No complaints here. I’ve grown bell peppers in a container on my balcony near lice infected parsley and cilantro, so imagine the disappointment. Hopefully, this year the bell peppers will join the growing madness 🙂
Okay, now. Let’s get to the recipe!
I’m going double recipe today. Wholegrain spelt tortillas that you can use like regular white flour tortillas and a beautiful bright yelllow turmeric falafel.
What I love about these wraps – besides the obvious deliciousness 🙂 – are the colours. Colourful food makes me smile. If you like them use the sides that I used in this recipe or choose whatever coloured veggies you like. But choose a variety. Reds, greens, purples, yellows… Whatever you find, toss them in!
We’re making a tahini sauce to go with falafels. If you’re a dishwashing maniac like me, stop right now! By dishwashing maniac, I mean insanely washing every dirty dish that I see while I’m cooking. I hate washing dishes after the meal, I’m not crazy 🙂 My point was, there’s no need to wash the food processor after making falafels. Just add the ingredients for the sauce and the liquid will clean it up. Yep, we saved a little time right there 🙂
If you are making homemade tortilla wraps (recipe below), make the dough beforehand and leave it to rest while you make the falafels.
Falafel balls
Preheat the oven to 200 °C and line a baking tray with baking paper.
Pulse all ingredients in a food processor until well combined. It should have an almost creamy texture with some small crumbs.
Divide the mixture into quarters. With slightly wet hands, form six balls from each quarter. Wash your hands if they get too messy, otherwise, the mixture will start sticking to them.
Place the falafel balls on the baking tray and bake them for 20-25 minutes or until just slightly golden. These falafels are very delicate, so treat them carefully.
Sauce
In a food processor or a blender combine all ingredients and pulse until the mixture is smooth.
Sides
Chop red cabbage and carrot into thin slices and drizzle them with lemon juice. Chop pistachios and parsley coarsely.
Wraps
Divide the dough into 8, roll them and cook them 30 seconds each side.
Serve falafel balls with sides and tortillas while they are hot.
Combine all ingredients in a bowl, then transfer it to a flat surface and knead it for 5 minutes.
Cover with plastic foil and leave it to rest for 30 minutes at room temperature.
Divide the dough into 8 balls, flatten them with the palm of your hand and roll them out on the lightly floured surface to 15-20 cm in diameter.
Don’t stack the rolled tortillas or they will get soggy.
Brush off excess flour. Cook on a griddle or big pan over medium-high heat for about 30-second each side. If flour starts to accumulate in the pan, wipe it off with a paper towel.
Need more ideas for colorful lunch recipes? Here they are:
This scrumptious, flavor-filled teriyaki eggplant is going to wake up your taste buds.
Teriyaki Eggplant. We are going Japanese today. Well, not exactly. I’m not gonna lie. This recipe is not a super authentic teriyaki recipe. After all the star of the dish is eggplant instead of meat of fish.
But it is A-M-A-Z-I-N-G! I could eat it for breakfast, lunch and dinner. And the next day for breakfast, lunch… I think you get the point 😀
Teriyaki is actually a method of cooking in Japan, but here we know it more as a type of sauce mainly made with soy sauce, sake, mirin and sugar. Teriyaki is made by marinating or basted meat or fish wit teriyaki sauce and then grilled, roasted or broiled. This gives the dish a nice shine, which we all like, right?
You could basically use whatever veggie you like. To me eggplant is one of the most meat-like vegetable there is. If you’ve never grilled it outside in the summer, please try it, you won’t regret it.
One of my favourite thing about this recipe is adding plum wine. Aaaah, the smell 🙂 I’m giggling, from the alcohol in the air. No, really, I’ve tried making eggplant with soy sauce and teriyaki sauce, but adding plum wine was a winner for me.
On the more personal note, I’m busy making promo material for the new dance show we’re making with my lovely fellow ladies from Tribal Bizzare Dance Troupe. It’s gonna premiere in May. We had our photoshoot more than two weeks ago and now I finnaly have some time to work on those photos. Happy me.
Now, let’s roll up our sleeves and get to work!
Tag #useyournoodles so I can see your beautiful UYN creations. Also, stay in touch on Facebook and Instagram or subscribe to get the recipes directly to your mailbox ♥
After you see how easy it is to make tomato ketchup at home, you’ll never want to buy it in the store again. It takes so little time and almost no effort.
I used to be a ketchup addict and I mean every word. I could eat it on bread without anything else until my mouth was burning from all the sugar and acid. Then one day I realised that it is actually junk food, so I stopped eating it. But of course, pretty soon I was craving it again, so I decided to make my own using whatever was in my pantry.
There are a lot of different ketchup recipes out there, from the ones that only use garlic and onion, to the ones that use a variety of spices. There are some that use fresh tomatoes, to the ones that use canned and dried tomatoes. This recipe is using lots of spices and tomato purée, because I want ketchup to be done in mintues. When I need my ketchup, I need it immediately! 🙂
For me the key ingredient in homemade tomato ketchup is clove. It adds a deep, sweet aroma. But, you really need to be careful, because too much of it can make your ketchup tarty.
The trick here is to leave the tomato purée uncovered while it is cooking, so it can thicken quickly. And you’ll want to stir it constantly, otherwise you’ll have a messy kitchen and you can get burned.
Tag #useyournoodles so I can see your beautiful UYN creations. Also, stay in touch on Facebook and Instagram or subscribe to get the recipes directly to your mailbox ♥
The cold weather can sometimes get to us. But not with this immune-boosting turmeric tea with elderlower and some other amazing healthy ingredients.
We got a little snowy surprise yesterday, so I ran out to shoot my immune-boosting elderflower turmeric tea. I was soaking wet in a matter of minutes, but luckily I had this (already cold) tea right at my hand. 🙂
Let me tell you what’s in this tea. Only good stuff, I promise.
There’s elderflower, one of my favourite kinds of tea. I pick it myself in spring and keep it airtight for whole year. It’s amazing for your immune system and for detoxifying your body. Another great ingredient – thyme. We usually use it in cooking, but it taste amazing in teas. Just be careful not to add too much or your tea might taste like soup. You can excange it for wild thyme, in that case you should double the amount, because it is milder. Thyme is one of the easiest herbs to grow at home, so I suggest you head to a gardening store this spring and get a thyme plant.
This tea gets its colour mostly from turmeric. I used to hate the taste of turmeric, it kind of felt strange and too strong. But as I introduced it little by little it grew on me. Now, I love it! In cooking and in tea making. So turmeric tea in any form is amazing and super beneficial. And if you add some pepper to it, your body can absorb the good stuff much better. Ok, we got to honey. We all know honey is so much better than white sugar, because it contains lots of vitamins and minerals. But, buying just any honey at the supermarket is wasteful. It has probably been heated over 40 °C to remain liquid, but that also means it has lost a lot of its functions. Try to find a local producer that doesn’t heat honey. My favourite is linden honey.
Like all other ingredients in this tea ginger is mindblowingly good for immune system and so much more covering from cancer to weight loss. And here’s our last ingredient – lemon. If you were like me, lemon was the first thing your parents gave when you were ill. And it was for a good reason.
There you have it, my immune-boosting elderflower turmeric tea. Helpful if you are ill, but also a good way to keep your health in check!
Head on to the recipe and let me know what kind of tea do you like to drink to boost your immunity system in the comment section.
Tag #useyournoodles so I can see your beautiful UYN creations. Also, stay in touch on Facebook and Instagram or subscribe to get the recipes directly to your mailbox ♥
Rich, melt-in-your-mouth triple chocolate sour cherry brownies. An easy recipe for decadent homemade chocolate brownie explosion.
What’s better than chocolate? Triple chocolate. And even better are these triple chocolate sour cherry brownies with bittersweet, semi-sweet and white chocolate.
Since it is Valentine’s day on Sunday, I think it’s appropriate to do something chocolaty. One of my Instagram followers suggested I did a brownie recipe, so I’m making it! How exciting is this?
I’m by no means a brownie expert. This recipe came out by pure luck. It was one of those moments when you say, I’m just going to make something. So I did, I checked out a few recipes, written down some thoughts and ratios and started cooking. After the brownies came out of the oven the first time I was smitten by them. They were the perfect ratio between a cakey and fudgy brownie, in favour of cakey, which is what I like. Later I added more sour cherries and some white chocolate chips on top, just because I can 🙂
If you’ve ever made brownies, you know they can be fudgy and dense, or they can be more cake-like. These brownies are more on the cakey side. There is some baking soda in them and an extra egg, so they have a cakey texture on top and the bottom, but they are thick on the inside, because the ratio between butter and chocolate to dry ingredients is high. There are bittersweet chocolate chips in there, which gives them extra gooeyness. White chocolate chips and sour cherries on the top are for some sweet and sour, moist kick. Believe me, they re even better than they sound.
If you are wondering how to make a perfect brownie, Samina from The Cupcake Conffesion has written a nice post about Top 5 mistakes to avoid when making brownies. They might seem obvious, but from my own experience I say, the obvious mistakes are the ones we make most often.
As for the cooling down goes, I’m the one that’s always impatient. I want to dig in immediately. But, if you are planing on serving your brownies to someone, please don’t do that! There’s almost no possibility you’re going to be able to cut them into beautiful piceces, or even taking them out of the pan, without messing them up. The best is if you cool it down completely. If there’s no one waiting for these little goodies, dig in with a spoon, while they are hot. But watch out that no one is looking 🙂
Tag #useyournoodles so I can see your beautiful UYN creations. Also, stay in touch on Facebook and Instagram or subscribe to get the recipes directly to your mailbox ♥
Preheat the oven at 175 °C. Butter the sides and the bottom of a 20×33 cm (8×12 inch) pan and line it with baking paper.
Put the bittersweet chocolate and butter in a large bowl and set it over a saucepan of simmering water. Stir occasionally, until the chocolate and butter are completely melted.
Turn off the heat and add the sugar. Whisk until the sugar is completely combined, then remove from the saucepan and wait for the mixture to cool for about 10 minutes.
Whisk in the eggs, one by one.
Add vanilla bean powder, baking soda, salt, and a third of the flour to the chocolate mixture. Whisk well. Add the rest of the flour and whisk again until the mixture is smooth.
Stir in the bittersweet chocolate chips.
Pour the batter in the prepared pan and sour cherries. Don’t press them in.
Bake for about 25 minutes or until the edges start to pull away from the sides of the pan. Keep in mind that it is better to slightly underbake than overbake brownies.
When you take the brownies out of the oven sprinkle them with white chocolate chips. Here you can press in a little if you like.
Wait for the brownies to cool completely, then lift them up together with the baking paper and cut them into 15 pieces.
Store in a plastic wrap or air-tight container at room temperature for up to 4 days.
For more Valentine’s day dessert ideas check my Coffee Pudding recipe.
PRINT THIS TRIPLE CHOCOLATE SOUR CHERRY BROWNIES RECIPE AND MAKE YOUR PERSONALIZED USE YOUR NOODLES COOKBOOK
Looking forward to spring but also looking back to autumn with these moist pumpkin cupcakes topped with cream cheese frosting made of cashews.
Aaaah cupcakes!
And pumpkin!
And frosting!
… And crumbs!
I’m doing a second pumpkin recipe in a row. That’s because I had a big pumpkin waiting for me in the basement. My relatives from Croatia gave it to me to try it out. It is a big pumpkin with a blue-ish skin and a deep yellow-orange sweet meat. They call it Turkinja in Croatia. I’m a sucker for pumpkins with very sweet meat, so this one is going to the top of my list, right next to hokkaido pumpkin.
We’re having pretty depressing days here. Like, really depressing. And these pretty pumpkin cupcakes are all gone. So I’ll be testing some new dessert recipes today, to cheer myself up. If you’re feeling down I suggest you start baking immediately!
You’ll notice that I’m separating eggs, whipping eggwhites and adding them at the end. I’ve been using this technique for a long time now. The basic cupcake recipe has been handed down to me by my mother in law. An it has never failed me.
I’m a mess sometimes. I forget key ingredients so often. Unsalted bread is a constant at our house. Not to mention the cupcakes! I’ve made them without oil and even without baking soda. But since I’m whisking the eggwhites separately, this doesn’t really seem to be such a big a problem. They rise a bit more with the baking soda, but it’s not a drastic change.
If you prefer the easier version (wet ingredients together, dry ingredients together, no eggwhite whisking), do it! I haven’t done it, but I’m pretty sure it will turn out just fine. Let me know if you try that.
Tag #useyournoodles so I can see your beautiful UYN creations. Also, stay in touch on Facebook and Instagram or subscribe to get the recipes directly to your mailbox ♥
PUMPKIN CUPCAKES WITH CASHEW CREAM CHEESE FROSTING
Course
Dessert
Keyword
cream cheese frosting, cupcakes, muffins
Total Time1hour30minutes
Servings12cupcakes
Ingredients
PUMPKIN CUPCAKES
2cupswhole grain spelt flour
1tspbaking soda
4tspground cinnamon
1tspground ginger
1tspallspice
1tspground cloves
1/2tspground nutmeg
4eggs
2/3cupssugar
1/2cupsunflower oil
2cupspumpkin puree
2TBSPlemon juice
pinchof salt
FROSTING
2cupspre-soaked cashewsat least 5 hours
juice of 2 lemons
1/2tspsalt
6TBSPhoney
1-2TBSPwater
TOPPINGS
pumpkin seeds
lemon zest
Instructions
Preheat the oven to 170 °C.
In a large mixing bowl combine flour, baking soda, cinnamon, ginger, allspice, cloves, and nutmeg using a whisk.
In the bowl of the electric mixer, fitted with a paddle attachment, blend together the egg yolks, sugar and sunflower oil on medium speed until well combined.
Add pumpkin puree and lemon juice and blend again.
Keep your mixer on medium speed and slowly add the flour mixture to the yolk mixture.
In a separate bowl (using a clean whisk attachment or a hand mixer) whip egg whites and a pinch of salt until it is stiff.
Using a rubber spatula, gently fold the egg whites into the batter until well combined.
Divide the batter among 12 paper-lined muffin cups, filling about 3/4 full.
Bake in the preheated oven for about 20 – 25 minutes, until the toothpick comes out clean.
Cool in the baking pan for a few minutes, then transfer to a cooling rack to cool completely.
To make the frosting, take cashews, lemon juice, salt, and honey and blend in a blender until it has a smooth cream-like texture. If necessary add 1 or 2 tablespoons of water.
When the cupcakes have cooled completely frost them with the cashew cream cheese frosting and top with pumpkin seeds and lemon zest.
Notes
The smoothness of the frosting will actually depend on the quality of the blender you have. My blender is not top quality, so it’s quite difficult getting a perfectly smooth frosting
This are seriously delicious pizzas. Even though they don’t have any tomato sauce they are creamy and crunchy. And I’m loving the colours here. Colour means nutrients, right?
Last year I was vacationing in Italy a few times and I must say I fell in love with its people, food and beautiful sights. I was there before, duh (it’s our neighbouring country)! It’s just that my way of visiting a country has changed over the years. I used to travel in a rush, I had to see everything. I even felt a little dissapointed if I missed something out. During my travels I’ve realised that being a tourist shouldn’t mean, you’ve seen all the sights and been to all the places listed in your travel guide. It’s slowing down to have time to observe how people of other cultures interact, what they do, how they talk, what they eat, what they wear. It’s talking to locals and relaxing over a cold beer or a hot cup of coffee. It’s also seeing the nice places, but those that you really appreciate and will stick in your memory.
If I think of Italy and my travels there, I immediately think of pizza and pasta. I know, a cliche. But the fact is that although Italians have a lot of other thing to offer culinary-wise, pizza and pasta are the ones that stick out! You can’t miss those.
Here in Slovenia, the pizzas in restaurants are full of different ingredients. They are totally different than in Italy. Good, but different. If I’m honest, I prefered the ones from Italy. They can make a simple pizza with tomato sauce only feel like you are in heaven. This pizza by the way is now my favourite kind of pizza!
But enough about the Italian pizzas. I’m here to make a totally different pizza with all but the usual ingredients. This pizza does not have tomato or cheese. Think of it more like a winter comfort pizza. Instead of tomato sauce I’m using pumpkin puree flavoured with smoked paprika and oregano. The toppings are chard, chickpeas, capers, sesame, chilli pepper and lemon juice. I assure you these mini pumpkin pizzas are yummy.
Tag #useyournoodles so I can see your beautiful UYN creations. Also, stay in touch on Facebook and Instagram or subscribe to get the recipes directly to your mailbox ♥
Keyword
pizza dough, spelt pizza dough, wholegrain pizza dough
Total Time3hours
Servings4
Ingredients
PIZZA DOUGH (~400 GRAMS)
3cupswholegrain spelt flour
1 1/3cuphot waterabout 40 °C
1/2tsphoney or sugar
1 1/2tspinstant yeast
1tspsalt
2TBSPolive oil
PUMPKIN SAUCE
2cupspumpkin puree
2tspsmoked paprika
2TBSPdried or fresh oregano
salt
black pepper
TOPPINGS
12chard leavesonly greens not stalks
3/4cupcooked chickpeas
1/4cupsalted capers
3TBSPsesame seeds
1/2big medium-hot chilisliced thinly
1or 2 lemonscut into wedges
Instructions
PIZZA DOUGH
Put the flour in a bowl and make a well in the middle. Pour hot water in the well, add honey and dissolve it in the water. Add yeast to the water and dissolve it.
Then start incorporating flour little by little, until the mixture has the consistency of a soft yogurt (note: not all the flour, just a few tablespoons). Cover the bowl with a cloth and leave in a warm place for 15 minutes, or until the mixture starts bubbling and rising.
Then add salt and oil and start stirring with a wooden spoon from the center and slowly incorporating the rest of the flour.
When the dough stops sticking to the spoon, start kneading in the bowl with your hands.
As soon as your dough starts coming together and you’ve used almost all the flour, you can transfer the dough to a smooth surface. Knead the dough for 10 minutes. If the dough sticks to the surface add a little remaining flour from the bowl. If it does not stick, it is not necessary to add more flour. Because all flours are a little different you might end up with a bit flour left, or you have to add a bit more (but not more than 1/4 cup).
Take another bowl and coat it with oil, then transfer the dough into this bowl and turn it around, so all the sides of the dough are oiled. Cover the bowl with a plastic seal or a plate. Leave it to rise in a warm place for about 1 – 2 hours until it has it is double the size.
When it has doubled, punch it to push the excess air out and knead quickly (only a few kneads). Cut the dough first into four, then into two, then into three. You should end up with 24 tiny dough balls.
MAKING PIZZAS
Roll every ball of dough into circles about 10 cm wide. You can use a rolling pin or the palm of your hand.
Lightly flour the surface and place the pizza circles on it. Cover with a cloth or plastic foil and leave to rise for 30 minutes.
Preheat the oven to 220 °C. Leave the baking tray in the oven, so it also gets heated.
Meanwhile combine the pumpkin puree, smoked paprika, oregano, and salt and black pepper by taste.
In a pan boil the water, add the chard leaves and cook for 1-2 minutes. Take out of the water and cut into smaller pieces.
After 30 minutes take out the tray, cover it with baking paper, and place pizzas on the paper.
Spread the pumpkin puree over the pizza (about 1 TBSP per pizza), top with chard, chickpeas, and capers.
Return the tray to the oven and bake for 10-12 minutes. The dough should be soft on the inside, but crispy on the outside.
When it is baked, take out of the oven and top with slices of chilly and sesame seeds.
Serve with wedges of lemon, so everyone can add as much lemon juice to the top as they want.
Notes
If you can’t get all 24 pizzas in the oven at once, don’t worry, bake it in two or three batches. The remaining flattened dough will wait until the pizzas are done, nothing wrong with that. When the first batch is done, remove the baked pizzas from the tray and repeat it from number 6 (Instructions for the pizzas).
A simple way to make your own pumpkin puree is to cut the pumpkin in half. Season with a little oil, salt, and black pepper and bake at 180 °C until the pumpkin is tender (30 minutes to 1 hour depending on the size of the pumpkin). Then blend.
PRINT THIS RECIPE AND MAKE YOUR PERSONALIZED USE YOUR NOODLES COOKBOOK
We use cookies to ensure that we give you the best experience on our website. If you continue to use this site we will assume that you are happy with it.